
Preparing meals at home means having full control over the ingredients you choose, experimenting with tastes in any way you want, and refining your culinary skills. However, the full capacity of any kitchen can only be achieved if the appropriate tools are at hand. This attachment opens the door to grinding fresh meat, custom blends, and other imaginative applications such as breadcrumb making or vegetable grinding. This article examines the benefits of using the KitchenAid meat grinder attachment, describes its diverse range of applications, and provides guidance on selecting an appropriate grinder for your specific needs. Whether a professional or an independent kitchen warrior, this guide will take you toward the next dimension in cooking with this indispensable tool on the back cover.
Introduction to Meat Grinder Attachments
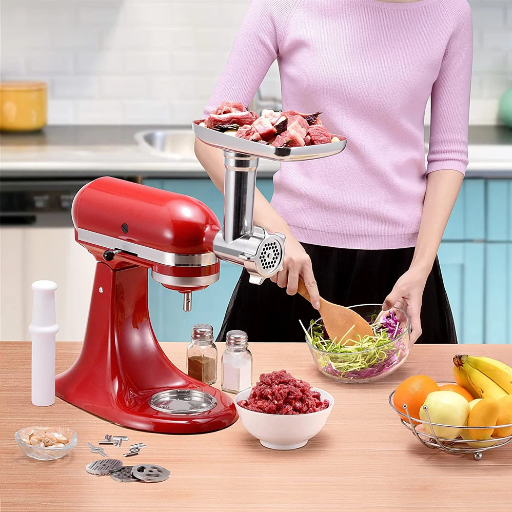
Meat grinder attachments are devices meant to attach to compatible stand mixers, such as KitchenAid, turning them into a multipurpose grinding workhorse. Meat, poultry, or fish can be ground with these attachments for custom blends for burgers, sausages, or other recipes. They come with various grinding plates to discriminate texture, can be installed with ease, and are even easier to clean. A meat grinder attachment will help budding home chefs gain greater control over the quality and freshness of ingredients while being less reliant on pre-packaged ground meat. An absolute must for anyone furthering their culinary adventures.
What is a Meat Grinder Attachment?
The meat grinder attachment is a contraption designed to join compatible kitchen gadgets—for instance, stand mixers—to grind raw meat. Made of stainless steel, or high-grade aluminum, or heavy-duty plastic, the attachments provide mechanisms for either grinding, mincing, or in some cases, stuffing meat for sausages. Equipped with an auger and cutting blade, as well as interchangeable grinding plates, the attachment offers maximum control over the final texture and consistency. These days, top-notch safety features like non-slip bases and overload protection systems are thrown in to ensure safe and efficient use. Besides, the meat grinder ensures it cuts waste as you can measure portions perfectly and use cuts that are mostly ignored. Modern designs with dishwasher-safe parts and ergonomic styling have made any meat grinder attachment a truly versatile tool for any home cook, both professional and amateur, to enhance productivity and upgrade every home cook in one way or another.
Benefits of Using a KitchenAid Meat Grinder Attachment
- Customization of Ingredients
The KitchenAid Meat Grinder Attachment allows the user to have their final say and select different cuts of meat and grind sizes to achieve textures for tastes suitable for his or her own needs and preferences. Properly ground, fresh ground meat is said to be less processed during all stages of production, thus more exposure to preservatives, from some studies, than either commercial ready-for-sale ground meat or prepackaged meats.
- Cost-Effectiveness
An additional advantage of home meat grinding is a long-term saving on the acquisition costs. Large chunks or bulk packages constitute more economic purchases per pound. The grind of such additional items as vegetables and breadcrumbs brings more money-saving possibilities for the owner.
- Improved Food Safety
The use of the KitchenAid Meat Grinder Attachment helps reduce the risk associated with pre-ground meat due to increased processing and higher handling, which can lead to bacterial contamination. Such users will be able to limit the butchery and preparation processes to a hygienic way of making fresh ground meat.
- Versatility in Meal Preparation
The KitchenAid Meat Grinder Attachment is suitable for any heavy grinding, such as mincing, shredding of cheese, and mixing of ingredients for sauce or sausage; the KitchenAid grinder comes with multiple plates for different grind sizes, enabling users to realize the great consistency required for various recipes, from burgers to fine pâtés.
- Durability and Efficient Design
A KitchenAid Meat Grinder Attachment should be an investment for years owing to its durable construction. The dishwasher-safe features ease cleanup and allow the product to operate efficiently when paired with KitchenAid stand mixers. Its ergonomic design encompasses adjustments that feel comfortable even when grinding for extended periods.
- Reduction in Food Waste
The attachment allows using less commonly needed meat cuts, thereby preventing wastage and contributing to the sustainability of a kitchen. It may be used to process trimmings for leftovers instead of discarding them, hence encouraging environmentally conscious cooking.
- Enhanced Nutritional Value
The homemade ground meat contains more nutrients as opposed to one that is industrially processed, mainly because meat loses a lot of nutrients when exposed to extreme heat during industrial processes. In this respect, when grinding meat fresh, one can conserve the intake of protein, vitamins, and minerals.
Features of the KitchenAid® Stand Mixer Meat Grinder
- Durable Design: Made from the finest materials for lasting service and steady performance while grinding.
- Multiple Grinding Plates: Includes various plates for coarse, medium, and fine grinding, providing versatility for different recipes.
- Ease of Use: Attaches to and uses the power of the KitchenAid® Stand Mixer for grinding efficiently.
- Food Variety: Not just meats; it can grind vegetables, breadcrumbs, and more, allowing for a variety of applications in the kitchen.
- Optional Attachments: Optional further attachments, such as sausage stuffer tubes, can be connected to extend its use.
All of these features make the KitchenAid® Stand Mixer Meat Grinder an extremely useful tool for any home cook looking to expand their culinary skills.
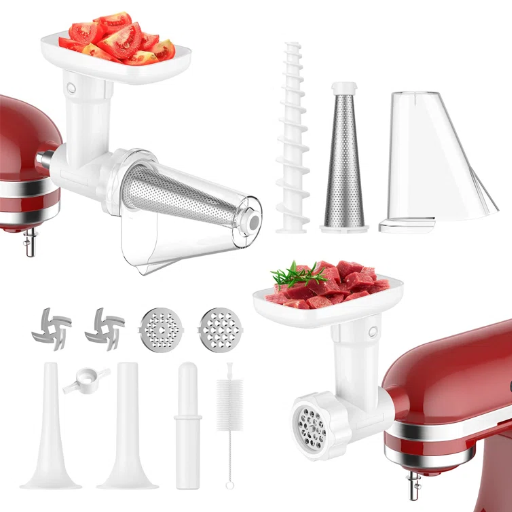
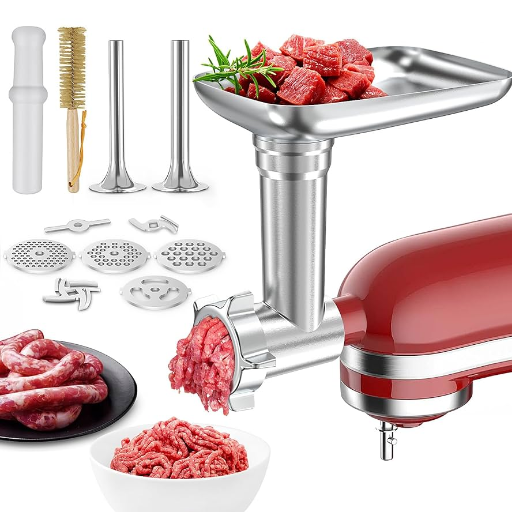
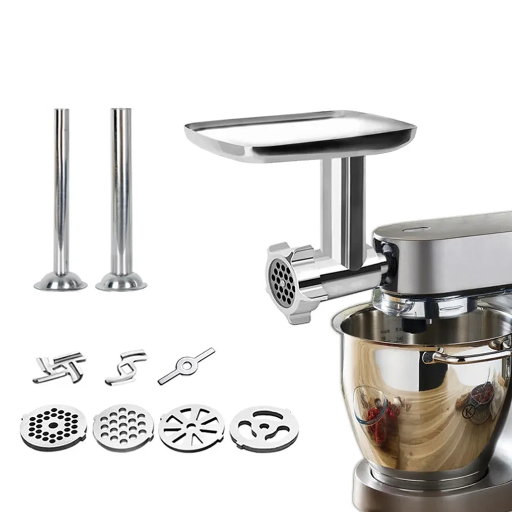
Overview of the Metal Food Grinder Attachment
The Metal Food Grinder Attachment for KitchenAid® Stand Mixers is designed with a heavy emphasis on durability and performance. Heavy-duty grinding operations are ensured by the heavy metal construction of the attachment. The attachment handles versatility in meal preparation, working very precisely on raw meats, soft vegetables, hard cheeses, and all sorts of nuts.
The grinder comes with three grinding plates (fine, medium, and coarse) that allow for the texture of ingredients to be manipulated and recipes to be adjusted accordingly. The presence of a sausage stuffer kit and food pusher adds to the versatility and usefulness of the grinder in preparing specialized recipes. All the removable parts are dishwasher safe for easy cleaning and maintenance.
This attachment runs on all KitchenAid® Stand Mixers by linking to the power hub for smooth performance. From home burgers and sausages to vegetarian patties, the Metal Food Grinder Attachment will bring professional results into the kitchen for every cook.
Types of Grinding Plates Available
- Fine Grinding Plate
This attachment is excellent for working with soft meats like chicken and turkey, creating very smooth textures ideal for pâtés, spreads, or finely textured sausage filling. It is also good for precisely grinding finely minced vegetables.
- Medium Grinding Plate
The mid-size plate serves as a well-rounded performer for numerous applications. It is commonly used to grind beef for burgers or meatballs with enough texture to keep moisture. Other uses include grinding semi-firm vegetables for stews or hash.
- Coarse Grinding Plate
Coarse vs. Fine Grinding: Which is Best for Your Needs?
|
Key Point |
Coarse Grinding |
Fine Grinding |
|---|---|---|
|
Texture |
Chunky and robust |
Smooth and homogeneous |
|
Best for Meat Preparation |
Sausages, chili, meatloaf |
Pâtés, delicate spreads, sausage filling |
|
Vegetable Uses |
Grating firm vegetables |
Pureeing soft or cooked vegetables |
|
Cheese Uses |
Grating hard cheeses |
Creating fine cheese pastes |
|
Cooking Applications |
Hearty dishes, rustic textures |
Refined sauces, emulsions |
|
Processing Time |
Shorter due to less refinement |
Longer for achieving smooth consistency |
|
Tool Durability |
Less wear on grinding plates |
Plates may endure more stress |
|
Ideal for Beginners |
Easier to manage |
Needs precise control |
|
Output Versatility |
Broader variety of textures |
Limited, more specific use cases |
|
Maintenance Needs |
Easier to clean |
Requires thorough cleaning |
Choosing the Best Meat Grinder Attachment
- Compatibility with Equipment
Make sure that the meat grinder attachment is compatible with your existing appliance, such as your stand mixer or meat grinder. Most attachments are designed for specific brands or particular models-identify connector types and mechanisms of mount to avoid compatibility.
- Grinding Plate Options
With attachments having several grinding plates, usually varying from a coarse texture to finer ones, you get increased flexibility in some of the recipes you prepare: for example, sausage, ground beef, or pâtés. Usually, diameters include coarse (6–8 mm), medium (4–5 mm), and fine (2–3 mm).
- Material and Durability
A good attachment is one that is manufactured from stainless steel or heavy-duty metal, so it can withstand wear, corrosion, and heavy usage for a very long time. Plastic attachments get lighter in weight and cheaper in price, but they do not have the same strength level under applied force.
- Capacity and Throughput
Consider the grinding ability in pounds (weight) of meat per minute. Home versions have grades of 1-2 pounds/minutes, whereas the heavy-duty commercial type may accommodate about 10 pounds/minutes.
- Ease of Assembly and Cleaning
Look for attachments with easy assembly and disassembly. Check if they are dishwasher-friendly or not. It’s important to avoid parts that could trap small amounts of food residue, raising the potential for contamination.
- Noise Levels
Some attachments have lots of noise. If that is an issue, see if there are models designed with quieter motor technology or acoustic insulation.
- Cost and Value for Money
Durability and Material Quality
Material quality and build, more so than design principles, would need to be assessed for durability and commonly recognized in high-grade stainless steel due to its corrosion resistance, heat resistance, and general longevity within usage environments where there is frequent usage and exposure to moisture or alternating temperatures. Remarkably, polymer-based materials such as food-safe BPA-free plastics could offer a viable alternative for lightweight yet durable options for less demanding tasks. Additionally, modern settings for material engineering have also brought forward composite materials for a hybrid solution, synthesizing the strength of metals and the flexibility of polymers to shore up both structural integrity and ease of use.
Further products with reinforced joints and welded or seamless construction can attest to their durability, thus reducing haircuts or wear in the long run. To guarantee longer product life, consider the attachments or tools that were tested for quality under realistic application scenarios through fatigue or stress-resistance assessments. The actual specification is mostly highlighted in product certification or technical documentation, serving as a key indicator for reliability and stability in professional applications.
Compatibility with KitchenAid Stand Mixers
KitchenAid stand mixers are equipped with a sturdy attachment hub capable of accepting an array of tools and accessories for numerous food preparation tasks. Most mixers and their attachments produced in the last twenty or so years are designed to work on all tilt-head and bowl-lift models, making the attachments versatile across the majority of the product line. Some specialty attachments could require a particular bowl size or motor wattage to achieve top-level performance specifications, which are usually outlined in the compatibility specifications within the product manual or the mixer’s model documentation, allowing for checking of attachment compatibility with a given appliance. It is the added adaptability that makes KitchenAid stand mixers the basis of both the home and professional kitchens.
Ease of Use and Cleaning
KitchenAid stand mixers are famous for their orientation toward ease of use, a characteristic that truly sets the equipment near the top of the list for any cook, regardless of experience. Tilt-head models permit easy access to the mixing bowl and attachments for adding ingredients as they mix. Meanwhile, the bowl lift model provides better stability when working with heavy mixtures, suited to professional-grade needs.
Most parts, such as bowls and normal attachments, are dishwasher safe, so cleaning will take less time. As an alternative to dishwasher cleaning, a quick wash with mild soap is advised for the specialty tools or those with a non-stick coating, thus increasing the lifespan of the tool. The easy operation and less-involved cleaning method give more efficiency in a kitchen that can comfortably support both casual cooking and intense baking.
Setup and Maintenance of Your Meat Grinder Attachment
Setting up for the meat grinder attachment begins with attaching it securely to the appliance as described. Be sure to lock the attachment firmly in place so that it cannot move during use. Insert the grinding plates and blades in the order indicated by the instructions so that the attachment fits together correctly and can be used optimally. For cleaning, after each session with the grinder, dismantle it, and clean all removable parts of the feed tube, plates, and blades using warm soapy water. Let them dry completely to avoid rusting. Do not submerge the motorized parts or housings in water. For longer care, sharpen the blades from time to time, especially when often in use, so they can work well. Always put all parts away dry, in an isolated place, to prolong the life of your attachment.
Step-by-Step Guide to Setting Up Your Grinder Attachment
- Prepare the Components
Check and clean all parts prior to use. Usually, this consists of the main housing, grinding plate(s), feed tube, blade, auger, and any screws or manuals for attachment. Make sure all parts are dry and clear of any debris from former use or from packaging for ease in assembling and operating.
- Attach the Grinder Housing
Attach the grinder housing to the stand mixer/motor base. Fit the connector on the housing to the motor base port. Secure the fit by twisting a locking knob or tightening a screw on the housing. Ensure that the attachment is tightly secured with little excess movement during execution.
- Insert the Auger
Insert the auger into the grinder housing, making sure the auger lines up with the motor shaft that moves food through this grinding process. Anything less than a good fit can cause jamming.
- Add the Blade and Plate
Fit the cutting blade onto the auger with the sharp edge oriented outwards toward the grinder plate, followed by the fitment of the required grinder plate depending on preference (fine, medium, coarse), which is then secured with the locking ring, tightened so that it is snug but not overtightened.
- Install the Feed Tube
Attach the feed tube to the grinder housing, clicking it into position. Double-check its alignment to ensure stability when feeding ingredients during grinding.
- Conduct a Safety and Functionality Check
Make sure everything fits securely, and all moving parts are aligned perfectly. Double-check that there is nothing hindering the parts from initiating a smooth rotation. Until everything is locked into place, do not try and turn the device on, as this would only cause operational issues or further damage.
- Test Run Without Ingredients
Tips for Ensuring the Longevity of Your KitchenAid Grinder
- Regular Cleaning and Maintenance
After each use, take the grinder apart and clean all components thoroughly using warm, soapy water. Make sure that the pieces are not left with any food or soap residue, as corrosion or poor performance could be incurred in the former. The parts must be given plenty of time to dry completely before they are refitted so that moisture cannot collect inside the machine.
- Periodic Lubrication
If the parts of the grinder are made of metal, it is best to lubricate the gears or moving components with food-safe lubricant at least every six months, as this will reduce friction and wear so that your grinder works smoothly and efficiently.
- Avoid Overloading
Overfilling the grinder will put a lot of strain on the motor and attachments, causing premature wear and breakdown. Follow the suggested food quantities in the instruction manual, and always cut larger pieces into manageable sizes for proper grinding.
- Inspect for Damage
Due to wear or any damage, check for any bends or cracks on the body, blades, or rust that may arise; defective parts should be changed without delay to avoid further destruction while retaining the safety of operating.
- Proper Storage Practices
Tips and Tricks for Grinding Meat Effectively

- Chill the Meat and Grinder Parts
Always start with cold meat, chilled grinder components, and so on. Coldness preserves the meat’s texture and helps avoid processes that cause it to become mushy.
- Cut Meat into Smaller Pieces
Cut the meat into small chunks of equal size before grinding to lessen the strain being placed on the grinder and to attain an even texture.
- Use the Right Grinder Plate
The plate size of the grinder should correspond to your textural needs. Coarse plates will provide good results for sausages, whereas fine plates are appropriate for ground beef and other recipes.
- Avoid Overloading the Grinder
Feed through the grinder slowly to ensure steady working behavior. Overload will cause jamming and uneven outputs.
- Clean as You Go
The grinder should be kept clean of meat residues regularly during use to prevent clogging and maintain hygiene. It should then be disassembled for a thorough wash.
Pre-Chilling Ingredients for Better Grinding
Chilling the meat and meat grinder parts plays a crucial role in achieving an exact and even texture. Cooling meat down to temperatures just above freezing (32-35°F) ensures that the fat remains solid and does not smear, but can be cut cleanly by the grinder knives. Chilling the grinder plates, blades, and feeding tube will also reduce friction and heat development and thus best serve the operation of the equipment while at the same time not compromising the structure of the meat. Of course, the cooler conditions will prohibit potential bacterial growth, and higher safety-hygienic standards are maintained. This is exceptionally useful while dealing with meats having a high-fat content, allowing for very efficient ground sizing and even fat distribution.
Understanding Coarse Grinding and Grinding Plates
Grinder plates, which are precisely engineered, are usually made from stainless steel or hardened carbon steel so that they resist wear and maintain sharpness in long-term service. Their uniform performance decreases occasional uneven particle shape and size that could cause clogging and uneven grinding. Large plate sizes help to produce coarser grinds that provide a good texture for artisanal use, while smaller plate sizes produce finer results required for patties and processed meat products.
Reference Sources
-
KitchenAid Metal Food Grinder Attachment:
- Summary: This official KitchenAid attachment is designed to connect to any KitchenAid stand mixer. It includes multiple grinding plates (fine, medium, coarse) and sausage stuffer tubes, making it versatile for grinding meats, hard cheeses, and bread crumbs.
-
Target’s KitchenAid Food Grinder Attachment:
- Summary: This grinder attachment is marketed as a versatile tool for creating fresh ground meats and sausages. It includes fine and coarse grinding plates and is compatible with additional accessories like a fruit and vegetable strainer (sold separately).
-
Ben Starr’s Review of Smokehouse Chef Stainless Steel Grinder:
- Summary: This detailed review highlights the benefits of the Smokehouse Chef’s all-stainless steel grinder attachment for KitchenAid mixers. Unlike plastic or aluminum models, this grinder is dishwasher safe and durable.
Frequently Asked Questions (FAQs)
Q: What is the meat grinder attachment for Kitchenaid and how does it work?
A: The meat grinder attachment for Kitchenaid is a versatile tool designed to fit onto your Kitchenaid stand mixer. It allows you to grind meat, vegetables, and even hard cheeses with ease. This attachment comes with different grinding plates, enabling you to choose between coarse and fine grinds depending on your recipe. To use it, simply attach the grinder to the mixer, feed the meat through the food tray, and let the mixer do the work. This not only saves time but also ensures you can use fresh ingredients for your meals.
Q: Can I grind meat and make sausage with the Kitchenaid meat grinder attachment?
A: Yes, you can grind meat and make sausage using the meat grinder attachment for Kitchenaid. This attachment is equipped with two sausage stuffer tubes, allowing you to easily stuff casings for homemade sausages. When using this attachment, it’s important to maintain a cold grinding temperature to ensure the best texture and flavor in your sausage. Pre-chilling the meat before grinding can help achieve this. The grinder’s ability to handle large quantities makes it an excellent choice for batch cooking and meal prepping.
Q: Are there specific grinding plates for coarse grinding with the Kitchenaid meat grinder?
A: Yes, the Kitchenaid meat grinder attachment includes different grinding plates, including those designed for coarse grinding. The coarse grinding plates are ideal for creating a chunky texture in ground meat, which is perfect for recipes like burgers or meatloaf. To switch between plates, simply disassemble the grinder and replace the plate as needed. This flexibility allows you to customize your ground meat to suit your favorite dishes, all while making the process easy and efficient.
Q: How do I clean the meat grinder attachment after use?
A: Cleaning the meat grinder attachment for Kitchenaid is straightforward and essential for maintaining its performance. After disassembling the grinder, you should clean each part with warm, soapy water. A cleaning brush can be particularly helpful for removing any residue from the grinding plates. Additionally, it’s advisable to avoid putting the attachment in the dishwasher, as it may damage the parts. Ensuring that you clean it thoroughly after each use will help prolong the life of your attachment and maintain optimal performance.
Q: Can the Kitchenaid meat grinder attachment handle grinding large quantities of meat?
A: The Kitchenaid meat grinder attachment is well-suited for grinding large quantities of meat, making it a favorite among home cooks who enjoy batch cooking. Its design allows for efficient processing, so you can quickly grind significant amounts of meat for various recipes. When preparing large batches, it’s helpful to ensure the meat is cut into smaller pieces for optimal grinding. This attachment is particularly beneficial for those who want to take control of the quality of their meat and utilize fresh ingredients in their cooking.


