
Grinding your own meat at home has revolutionized the kitchen craft industry, and people are conscious of their overall well-being. A manual meat chopper, the best of its kind owing to its mechanical nature, is a kitchen accessory that enables one to make any desired adjustments on the texture, freshness, and nutritive value of the meat they consume. However, why would someone fancy a non-electric one when the electric options are available? And how does one utilize this device in their kitchen? All this and more will be discussed in this guide on manual meat choppers – their definition, usage, and the many ways in which they can enhance your cooking. Starting from the alternatives to use till achieving the results, this resource will help you to realize more about the choices you are making in your kitchen because creativity does not know bounds.
Importance of Using a Manual Meat Grinder

Manual meat grinders. Powerful machines giving the best grinding effects sit ideally with most people, including food lovers, as opposed to prepackaged meat. These grinders require little muscle to produce tender and exquisite ground meat. These machines are rather unpretentious, productive, and simple in design which makes them a practical, economical, and green option. Moreover, by nature of circumstance, such meat mincers can be cleaned remotely which means that private standards of cleanliness and safety can be maintained at all times. The use of a manual meat mincing machine is also great because it helps to mix the marinated meat as well as prepare the meat, which in turn goes into a healthier and tastier meal for the whole family.
Affordability and Cost-Effectiveness
Manual meat grinders also tend to be quite feasible in terms of the money they save. Their initial cost is typically lower than that of electric grinders and therefore lures the adoption rates of both the occasional and the frequent users for the former. Also, they usually need little disproportion or additional repair, unlike their electric counterparts, as there are no maintenance costs, and power consumption is lowered. Such skills can also be viewed in terms of the ability to buy beef from the butcher and trim it to the selected forms. This strategy is considered more cost-effective than buying in bulk, or over the counter, ready-made, and just adding water to dinner plans. These attributes address one major concern about people who cook which is the cost and the control and quality aspects of the foods they eat. Anyone looking forward to such attributes in their food production should gladly get the manual meat grinders.
Durability and Longevity
Manual meat grinders are designed in a user-friendly manner and strengthened to last quite a while, with metals such as stainless steel, cast iron, or heavy plastic being common. These alloys do not easily corrode, wear out, or distort even after production of many meal portions in tough environments. Good quality machinery is such that the parts engage one another in an efficient manner until becoming inoperative with minimal malfunction. Correct usage and servicing, including the cleaning of all non-stat ware parts and lubrication of moving components, will allow an Owner to benefit from a manual milling unit for decades on end. Also, the latest models come with detachable elements which are present for the reason that users can change the parts, thus increasing the lifespan of the device if ever worn out. It is why they are long-lasting and yet the most suitable for sustainable development for people to use.
Control Over Meat Texture
Once a manual meat grinding machine has been utilized, the beauty of it is that the operator has a great advantage by manipulating how much air, fat, or protein goes into the minced meat. This is particularly effective in the preparation of foods that are supposed to have a certain structure, such as sausages and meatballs, where coarse grinding or fine grinding is necessary. The settings of the grinding plates and especially the ability to slow down the rate at which meat goes through ensures that the ground meat fits the defined parameters. This also goes a long way in allowing for the cooking of different kinds of meat and getting the right balance of fat and meat. Such control is not easy with ground meat, which is already made, because the composition of what was used in making the ground beef sometimes remains a mystery. In this respect, a meat grinder can be a great advantage in achieving the desired taste, toughness, and fullness in the dishes made even by ordinary people, not chefs.
How to Use a Manual Meat Grinder
- Prepare the Meat
Cut the meat into small cubes or strips that can fit into the grinder. Ensure the meat is chilled but not frozen as it will help in getting the appropriate consistency while grinding.
- Set Up the Grinder
Next, opt for a solid surface to attach your food grinder, such as a countertop, the upper part of a table, or the like, and secure it using a C-clamp or a suction base. Everything else should be accomplished step by step as per the guidelines of the manufacturer in barricading the machine’s parts with emphasis on cleanliness and fitting.
- Insert the Meat
Usually, the meat is put into the feeding chute or the hopper, which is in the upward position of the grinder.
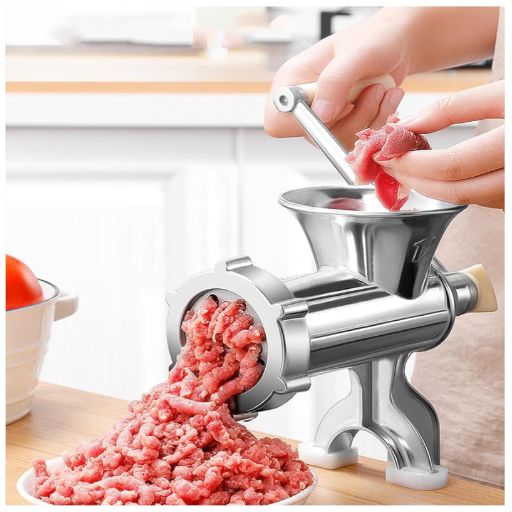
- Operate the Grinder
Slowly twist the crank handle so that you can force the meat into the opening of the grinder. Do not use your fingers. Instead, there is a pusher that is attached to the machine that you can safely put the meat and push. That will be much better than your fingers which might risk cutting them using the blades.
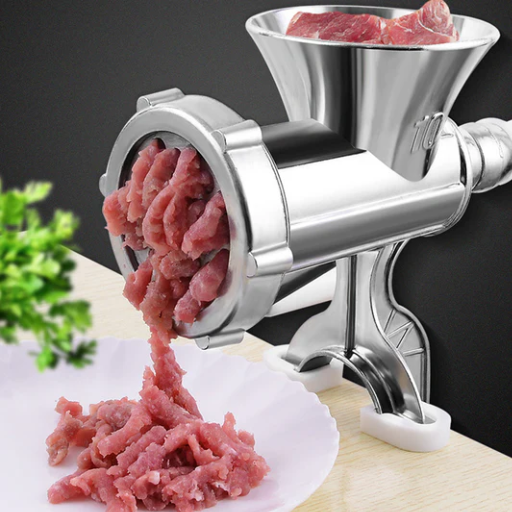
- Collect the Ground Meat
Set a bowl or pan directly below the incoming ground meat as it comes out of the knife and the plate portion.
- Clean Up
Assembly of the Grinder
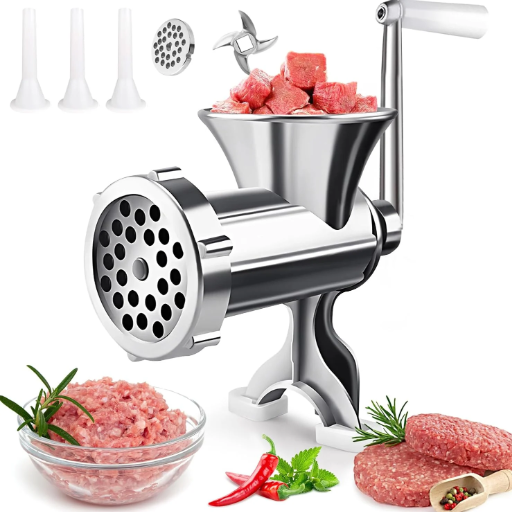
Once all the components are identified, with a confirmation that they are in good condition and complete, you should immediately start assembling the head of the grinder and then the body and any other parts that go along with it. For the first process, attach the grinding head to the main body using the lock nut and check the bolts for any backlash. Decide the proper orientation of the auger in the grinding head. With this, it should be correctly oriented such that it can rotate when used. Fix the blade on top of the other on the auger shaft, and your instructions should clearly mention that such service should have the blade with sharp edges that will contact the plate. selection of a particular plate that will suit the meat texture selected will follow, and after that, the ring will be placed to enclose the plate and prevent it from falling off.
On the pre-operating procedures for the grinder, make sure that all parts are correctly adjusted and well fastened to avoid operational failure and poor work results as a result of errors in assembly. Complete and correct assembly of the grinding machine includes proper performance of the work and reduces the possibility of damaging the equipment or putting the worker’s safety in danger. Proper adherence to the instructions on how to assemble the apparatus will also extend the working span of the grinder and keep the accuracy of the grinding process.
Proper Handling Techniques
There are certain techniques of shanks on how to handle the meat grinder so that perfect ease of operation is guaranteed without compromising the safety of the users. These tips and precautions can also help protect the equipment and the users from destructive forces. Please see below for the is the different tips on how to operate a meat grinder from a professional’s point of view:
- Wear Appropriate Personal Protective Equipment (PPE):
Take note that wearing safety goggles, gloves, and hearing protection is very much required for handling the grinder. Studies have demonstrated that occupational eye trauma of the crusade accidents constitutes nearly 10%, such that goggles are a relevant safety requirement
- Inspect the Grinder Before Use:
Visual inspection of the grinder must also be carried out to confirm that all elements are present. Close checking must be done on the fitment of the grinding wheel, ensuring the absence of any visible cracks or signs of wear. Studies suggest that wrong cutting wheel conditions contribute to most of the malfunctions, hence accounting for 30% of all grinder defects.
- Secure the Workpiece Firmly:
When grinding, clamp the material firmly to prevent any undesirable movement. Loose workpieces can cause low accuracy and are a problem that could result in a threat to safety, as any of these it might become a missile during operation.
- Maintain Correct Posture and Grip:
One should have a central posture with both hands holding the grinding tool. This orientation minimizes shaking and mistakes of clasping due to accidental slip, the latter of which is responsible for an estimated 25% of misuse in industrial grinding.
- Control Operating Speed:
Grind materials at the recommended RPM (revolutions per minute) according to the task and the materials’ exact specifications. The use of an abrasive wheel at speeds beyond the present value is hazardous since it risks causing the wheel to split into two, hence inflicting injury. Enquire the acceptable limits from the manual for speed ranges within the grinder.
- Avoid Overheating the Grinder:
Operating the grinder for an extended period of time without taking a break is dangerous as the tool is bound to get extremely hot, hence melting parts or causing losses of power. In this case, take breaks in between long working hours for both lubricant use and refreshment before continuing with the grinding machine working cycle. It is acknowledged that excess heat within the machine causes the machine to lose nearly 40% of its normal operation capabilities in accordance to the collated evidence.
Maintenance Tips for Manual Meat Grinders
The grinder must be checked thoroughly to ensure its manual components last longer and that it works as required without any specific problems.
- Clean Thoroughly After Each Use
Unplug the grinder and clean every part using soap and warm water. Rinse well, leaving no trace of meat, as remaining substances can easily rust the grinder.
- Dry Completely
Dry the whole equipment properly after washing it to ensure that no water is retained by any of the parts as this can encourage rusting and corrosion.
- Lubricate Moving Parts
Use a bit of f Food grade oil on the metal parts especially the blade, screw, and plate for reducing friction and to keep rust away.
- Inspect for Wear
The knife and plate should be inspected regularly for blunting or any other kind of damage. If necessary, sharpen or replace them to ensure their operating efficiency.
- Store Properly
The grinder is best kept in a dry and tidy area. To avoid the accumulation of dust or dirt upon metal accessories, use a protective dusting sheet of cotton.
With these rather simple and easy-to-follow steps of upkeep, you’ll be able to keep the machine’s functions as well as its performance for many more years to come.
Cleaning Techniques for Longevity
It is crucial to take into consideration how contact with abrasive or cleaner wear contributes to the lifetime of your grinder. It is a method to clean instead of eliminating the dust. Clean the grinder-unscrew all the parts from the exterior, put the regions that can easily be removed, for example, the leaves, the post, and the dough boxes. A brush or a soft material is used to clean all particles that have accumulated in the inner surfaces. For intense cleaning, all the parts are cleaned off of any food objects and fats washed in bubbly and heated water. If all the parts have been washed, it is advisable to store them while they are wet to avoid the formation of rust.
When stainless steel parts are fitted in a meat grinder, use a safe cleaning agent made for this particular type of steel to prevent it from corroding and also retain its shine. For electric-powered machines, prioritise abrasive grinders and avoid immersing the motorized components under water. Wipe the exterior surfaces with a damp piece of cloth and get rid of dirt or dust from the ports and joints by blowing in air. Putting this cleaning technique into play on a regular basis will give optimal benefits in terms of the performance and longevity of the grinder.
Proper Storage Methods
Comparing Manual and Electric Meat Grinders
Manual meat grinders are frequently operated manually that makes them often preferred for lesser-rated ranges and the users who prefer lack of weight. Grinding is called off when they are not activated and the motor-less types grind in silence and require cheaper operating costs. The only weakness of these machines is that they have high demands in terms of the grind force a user has to apply and the quantity numbers tend to be slower. Electric meat grinders, for example, assist users to mince large volumes of meat pulp within a short time as they utilise power from a motor. Often these grinders, including some accessories such as multiple grinding plates or reverse operation, are generally powered and cost more.
Differences Between Manual and Electric Meat Grinders
|
Parameter |
Manual Meat Grinder |
Electric Meat Grinder |
|---|---|---|
|
Power Source |
Hand-cranked, no electricity needed |
Requires electricity to operate |
|
Ease of Use |
Requires physical effort |
Minimal effort, push-button operation |
|
Processing Speed |
Slow and time-consuming |
Fast and efficient |
|
Portability |
Lightweight and easy to transport |
Bulkier and requires a power source |
|
Noise Level |
Operates quietly |
Generates noticeable noise during use |
|
Maintenance |
Simple design, easier to clean |
More parts, time-intensive cleaning |
|
Cost |
Generally affordable |
Higher initial investment |
|
Durability |
Long-lasting with simple construction |
Heavier wear due to motor usage |
|
Customization Options |
Fewer attachments, limited functionality |
Many attachments for versatile applications |
|
Best Use Case |
Small batches, occasional home use |
Large quantities, frequent or commercial use |
Pros of Manual Meat Grinders
- Cost-Effective
Meat grinders that are operated manually are relatively cheaper in comparison with the electric type valued between $20 and $70 on average. And this is indeed the case as they enable one to avoid any costs associated with purchasing a meat grinder for purposes that are not common in the house.
- Durability
Manual meat grinders are made of minimalistic metal components, so they last rather long. Given that they are not motor-driven and therefore exhibit little streamlining over time, it can be said that they provide a lot of service for their period of use.
- Portability
These hand-operated mills do not need a source of energy, they do not have a cable or batteries, so they work very well, for instance, in harsh mountains where electricity might not be available, and for some holiday activities like camping. They can be easily carried around when in motion because they are usually designed to be light.
- Ease of Maintenance
Due to the reduced number of components, the cleaning and maintainance of a hand churn is easy and does not consume much time. This phobia of uncleanliness is welcomed by those who dislike assembling and disassembling the machines.
- Control Over the Grinding Process
Grinding speed and accuracy are left to the manual grinder user’s discretion as well. Different preparation, when much of it is grounded, also allows the cook to make sure that the expected consistency is maintained for every single element of a recipe.
Cons of Manual Meat Grinders
- Labor-Intensive Operation
Operators have to use more muscle while manually operating these devices, which makes it one of the main weaknesses of these tools. Such activities usually involve a lot of meat that is beaten over and over again. This means that trying to complete such activities using manual grinders will be more demanding than for the electric ones, by about 5 to 8 times, depending on the study conducted.
- Time-Consuming
Especially considering the manually operated machinery, which involves human power, they are slower than the electric models. Such inefficiency could hinder the performance of any user who processes more meat since manual means of doing so usually require, on average, three times the time to ground the meat compared to the automated means, subject to the size of the grinder and the type of meat being ground.
- Limited Throughput Capacity
Also, manual meat grinders are more likely to have smaller hoppers and obstructions, which limit in one way or another the amount of meat that can be produced at a time. Take an example, while some of these grinders are able to process up to 7 lbs of meat per minute, others manage only 1-2 lbs per minute.
- Restricted Versatility
Many hand grinders fail to function correctly when it comes to working with heavy meats or hard connective tissues; hence, there is a need to prepare them further, like cutting them into small chunks. Additionally, some of the models do not have alternate plates and or attachments, making them quite basic in terms of what they can do other than the normal grinding task.
- Lack of Consistency Under Heavy Use
Top Recommendations for Manual Meat Grinders
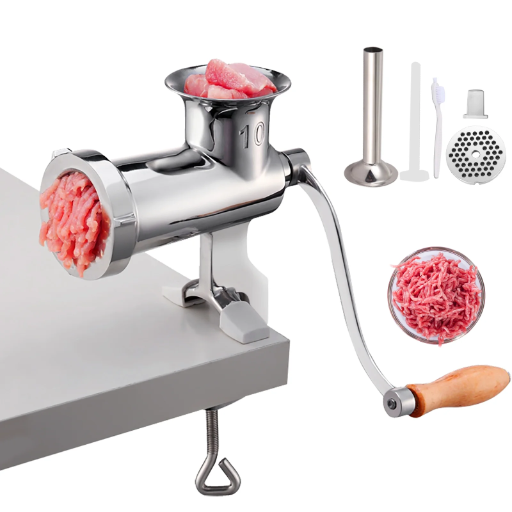
- LEM Products #10 Clamp-On Hand Grinder
Sturdy and anti-rust stainless steel material meets all the considerations of a mobile espresso grinder. The manual clamping system is another feature of this manual portable espresso grinder and you can operate it without any difficulties. The large size of the hopper is one more advantage of this espresso grinder, as you do not have to keep on refilling the coffee beans every now and then. For these reasons, the LEM # 10 is the optimal device.
- Weston #22 Manual Tinned Meat Grinder
In view of its robust structure, tinned for more effective use, the device known as this performs well to meet high-volume needs. Thus, adjusting the burrs in these grinders produces consistent results in terms of grinding the meat, which can easily be controlled in terms of other different textures like casings, skewers, etc.
- Victoria Manual Meat Grinder
With a strong case and an inbuilt two-layer tinned protective layer of Daub plating iron, the coffee grinder ensures long-term use. There are several interchangeable inserts for fine or rough grinding, and this type of mill can be used for processing any type of meat, fruits, and even grains.
- Huanyu Manual Meat Grinder
Quality and Performance Comparison
When it comes to both quality assessment and functionality, there are certainly highlights for each of the machines that make them convenient for specific uses. The Victoria Manual Meat Grinder is extra tough as it has been designed with a heavy-duty cast iron frame base and double-tin plating, making it very robust and durable against rust and unpleasant weather conditions. There are different kinds of grinding plates that make it possible for users to control the texture of the meat, allowing processing for multiple purposes. It also does well under high load conditions because of its thickness and that quality also should be regarded. Even though it is not the case for all, skilled users find that it does not wear easily and can be used for large volumes continuously.
Contrary to the factors described above, the Huanyu Manual Meat Grinder adheres to principles that feature adaptability and convenience. A person needing this mincer is able to continue with their work without fear of it rotating or crushing fingers, thanks to the suction rubber placed on it further held at smooth surfaces. But the relatively further reduced strength of the Victoria mincer is overcome by, say, the advantage of the sausage press. The push for ease of movement and size bias places this option primarily among users of domestic applications, and even such kitchens out of a limited size.
In the end, the selection of grinders will hinge on durability vis-à-vis flexibility. On one hand, if heavy-duty grinding is the order of the day, Victoria wins. On the other hand, if the focus is on how well packed and agile the grinder should be, then Huanyu is. Both approaches work very well in each case but address certain aspects of needs and purposes of the end users.
User Reviews and Unique Features
Consumer feedback often focuses on the application of the Victoria and Huanyu grinders, and some negative points can also be found. For example, the Victoria machines are highly rated for being sturdy, high-performing and for grinding of a high volume. Some note the cast iron shape of the equipment that provides better working conditions, and the users almost always accept the argument, however, saying that the equipment is a little bulky and heavy for efficient work in a small kitchen.
Reference Sources
-
Design of a Manual and Motorized Meat Grinding Machine:
- Summary: This study presents the design of a dual-mode meat grinder (manual and motorized) aimed at improving accessibility in both urban and rural areas. The machine is designed to handle power outages and ensure efficient grinding. Key features include a rotating shaft, cross-shaped knives, and a perforated disc for cutting.
-
Prevalence of Household Meat Grinder-Induced Severe Hand Injuries:
- Summary: This clinical study evaluates 64 cases of severe hand injuries caused by household meat grinders, particularly those modified with electric motors. It highlights the higher risk of amputations in children due to smaller hand sizes and discusses the need for better safety measures and public awareness.
-
Preventing Cuts and Amputations from Food Slicers and Meat Grinders:
- Summary: This OSHA fact sheet outlines safety guidelines for using meat grinders in workplaces. It stresses the importance of machine guarding, proper training, and the use of protective equipment like cut-resistant gloves. Employers are advised to implement lockout/tagout procedures during maintenance and ensure workers use plungers to feed meat into grinders.
Frequently Asked Questions (FAQs)
Q: What are the advantages of using a manual meat grinder?
A: Manual meat grinders are a great choice for home kitchen use, particularly for those who prefer a hands-on approach to cooking. They are typically more affordable than electric food processors and offer the versatility to create different types of ground meat. Many models, such as the stainless steel hand crank meat grinder, are designed for heavy duty use, making them ideal for grinding tougher cuts of meat. Furthermore, they often come with attachments like sausage stuffer tubes, allowing you to make your own sausages at home. Another significant advantage is that they don’t require electricity, which makes them perfect for outdoor cooking or in areas with limited power supply.
Q: How do I properly clean my manual meat grinder?
A: Cleaning your manual meat grinder is essential for maintaining its performance and ensuring food safety. Start by disassembling the grinder, removing all parts including the blades and feed tube. Most stainless steel manual meat grinders are dishwasher safe, making cleanup easier. If washing by hand, use warm soapy water and a soft brush to remove any meat residues. Be sure to dry all parts thoroughly to prevent rusting, especially if you have a heavy duty meat grinder with stainless steel blades. Regular maintenance will keep your grinder in top shape for years to come.
Q: Can I use a manual meat grinder for making sausages?
A: Yes, a manual meat grinder is excellent for making sausages at home. Many models come equipped with a sausage stuffer attachment, allowing you to fill casings with your ground meat mixture easily. A grinder with sausage capability provides the versatility needed to experiment with different flavors and textures. Using a hand crank manual meat grinder for sausage making also allows you to control the consistency of the meat, ensuring a perfect blend of spices and fat. This hands-on method can be more satisfying than using an electric food processor, especially if you enjoy traditional cooking methods.
Q: What features should I look for in a manual meat grinder?
A: When selecting a manual meat grinder, consider features such as the material, size, and ease of use. A stainless steel hand crank meat grinder is typically durable and easy to clean, making it a popular choice among home cooks. Look for a model with heavy duty stainless steel blades, as these will handle tougher cuts of meat more effectively. Additionally, a powerful suction base for home use can provide stability while grinding, enhancing safety and efficiency. It’s also beneficial to choose a grinder that comes with various attachments, such as a meat mincer sausage stuffer, to expand your culinary possibilities.
Q: Is a manual meat grinder suitable for heavy-duty tasks?
A: Absolutely, many manual meat grinders are designed specifically for heavy-duty tasks. Models like the manual meat grinder heavy duty version are crafted from durable materials, allowing them to withstand rigorous use. With features like stainless steel blades heavy duty powerful design, these grinders can tackle tougher cuts of meat that may be challenging for lighter models. Additionally, a sturdy table clamp can provide extra support during use, ensuring a safer grinding experience. Whether you’re grinding meat for burgers or preparing sausages, a heavy-duty manual grinder is a reliable tool for any home chef.


