
When it comes to butchering & processing deer meat at the comfort of your home, buying certain tools is a must. A meat grinder that assures top quality service, however, is indispensable to have in order to process your deer’s meat into finely minced meat specifically for making burger patties or sausages, among others. If you are not new to processing and preparing meals from the hunt, you will have to admit that choosing a suitable meat grinder is anything but easy work. This guide is therefore drawn up aiming to ease all that by providing the most comprehensive information at your disposal, from the key features to examine in the best meat grinder to what model you need to purchase in the market. Everyone who reads this post will be able to stand better with knowledge to make the right choice and purchase the meat grinder that corresponds to the tasks at hand, while ensuring efficiency, reliability, and the desired quality of the finished product in each period of grinding work.
Importance of a Meat Grinder for Venison Enthusiasts
Available Literature reveals that investigating the nutritional and environmental benefits of venison would be incomplete without consideration of tasks such as transportation, storage, and processing integrated into ground venison preparation. All these aspects of promoting meat consumption among venison consumers can be concluded in one simple argument: to allow the consumers to eat the venison in the manner they want. This is only possible because consumers can prepare their own venison meat recipes as they find fit. This service will be gladly offered by us to those who like to cook meat in their own buildings, especially for such food as minced meat.
Quality and Freshness of Ground Meat
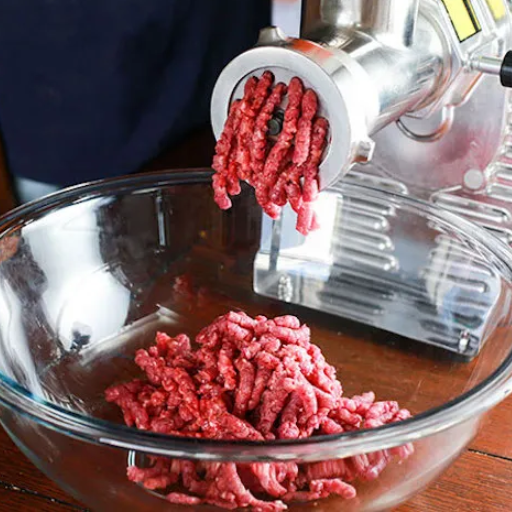
Meat grinding techniques are of utmost importance since the flavor and texture of the raw product directly depend on the processes and the environment maintained. Soon after grinding/ mincing, the meat is of vibrant and attractive color, firm to touch, and has a nice clean aroma, which spoils due to the influence of air, poor temperatures as well as preservative times. One study shows that when meat is ground at home with the best meat grinder available, the percentage of illness caused by two of the most common foodborne pathogens, E.coli and Salmonella, decreases, and the principles of cleanliness are sustained in the course of the preparation.
Using a meat grinder, the ground meat should be within the limits of or below 40°F (4°C), preferably, because this temperature helps to maintain the freshness of the product and control bacterial development. This protocol is supported by food hygiene norms which emphasize on chilling of all products during grinding and storage. Following these recommendations and grinding of meat only when it is needed, there is no chance that the product will be edible but boring.
Cost-Efficiency of Home Processing
It is more economical to process the meat at home than to buy pre-ground meat or fashionable cuts at the store. The main reason being sales of beef cuts which are normally lower in price per pound than ground beef bonds. For example, statistical data collected from USDA reveals there is a consistent gap in prices between primal cuts and pre-fabricated, encouraging bulk purchases for those households that consume meat frequently.
The other advantage is that buying this equipment, such as grinders, vacuum sealers, and household food storage containers, is a one-time expense that will amortize itself over time. Freezing of meat has, and continues to be, discouraged because it makes the shelf life of meat shorter, and there is also higher amounts of wastage of food. In other words, base-level freezer storage usually necessitates some form of waste reduction, but over time, the advertised convenience does provide some benefits. For individuals who are concerned about cutting down costs, this practice assists in exact measuring and control of ingredients and cooking instead of relying on expensive ready-to-eat food options from the market.
Convenience and Ease of Use
There have been definite improvements in the power tools suitable for preparing food at home. A good reason for these improved tools is that they expedite the home cooking process, especially with a vacuum stripping in which the containers are comparatively smaller, and the meat slicers usually have a digital interface and run in automatic mode. This ensures that the preparation takes place in the shortest time possible, while altogether enabling the proper overrunning results, considering that even flashes can avail them. Further, since the users are able to determine the portion they need easily, the gadgets are useful as one can utilize them in daily operations; an adequate quantity for long-term storage or full requirement, including meals that have already been planned. Research indicates that more and more people are adopting these measures, with many households resorting to these measures so as not to lose time or other resources without sacrificing the benefits that a well-balanced diet offers.
Factors to Consider When Choosing the Best Meat Grinder
- Motor Power
When the various uses of the grinder are formulated, one of them also includes selecting the grinder that is conventionally made with its motor power requirements. 300-500 watts should therefore be fine for this kind of grinder while the one to go for if you intend to use it more frequently is 1000 watts or more.
- Grinding Capacity
Define your grinding impact — this is usually denoted in pounds number for every minute. Typically a low duty meat mincer will grind 1 to 2 pounds every minute while the heavy duty models can grind more than 5 pounds in one minute and are recommended for cutting large shears of meat.
- Material Durability
Select a well-made grinder for Damson Prune Jam that is constructed using stainless steel or heavy duty aluminum, as these materials are more rust resistant and robust.
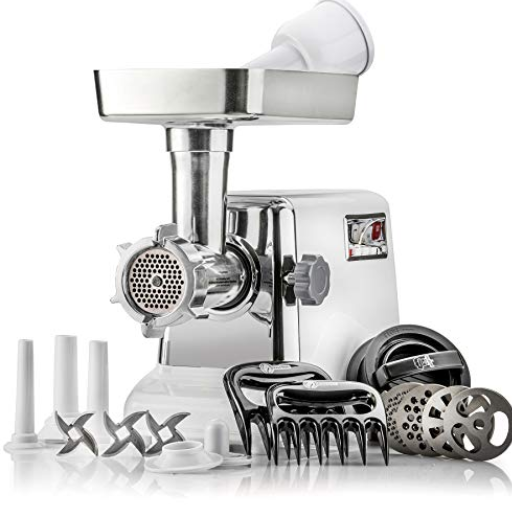
- Attachments and Features
Look for grinders with a number of plates that can be used for various grinds, sausage stuffing capabilities and reverse capabilities to reduce jamming.
- Ease of Cleaning
Motor Power and Grinding Capacity
The power of the motor in a meat grinder is one of the important factors, as it adds to the effectiveness of grinding and the quantity of meat that can be ground in a particular time. High-end and good-quality grinders have a power rating of 500-1200 watts. It may be noted that the commercial grade grinders may have a more than 1500-watt motor rating in order to be efficient in operation. While such motor ratings may not be practical for home use, grinders with 750-watt capacity or more will give consistent service even when processing tougher meats or higher volumes of meat.
Citing from this context, the minute’s motor power directly affects the grinding abilities to a in substantial way. The main home versions will be able to mince up to 3 pounds per minute. At the same time, other commercial heavy-duty types can extend to processing even more than 10 pounds per minute. These more refined specifications help to determine how well a certain kind of grinder can be suited to particular requirements, whether it is for one’s very own kitchen or for the corporate kitchen, in such a way that it functions effectively without the risk of overloading the motor.
Durability and Build Quality
The contribution that the quality and longevity of a coffee bean grinder have when it comes to the overall satisfaction of consumers can never be ignored. Many admired grinders are made using strong materials such as stainless steel and even heavy-duty aluminum alloy, without forgetting that these materials are corrosion and wear-resistant. For extra usage, such grinders may have additional enhancements as to reinforced gears and motors to increase their operational life without compromising the efficiency level. Further, parts of the barista coffee grinder have certain qualities that protect the inner parts of the machine from elements from without that may cause damage and even overheating, such properties include enclosed parts and even overload protectors. Such enhancements, no matter whether the coffee grinder is to be used at home or in a coffee shop, assure the users of low costs as these grinders are very effective and with relatively few breakdowns that are strenuous or necessitate regular servicing.
Ease of Cleaning and Maintenance
When looking at the ease of cleaning and maintenance, modern coffee grinders have such features that make this all a piece of cake. Quite many coffee grinders are made with some components such as the grinding burrs or the hoppers that are easy to remove which helps for easier cleaning or even the thorough cleaning of the component in question. Furthermore, attributes of the grinders, such as non-stick surfaces and polished surfaces, also reduce the chances of contamination or wear and tear. In addition to cleaning grinders, there are also mechanisms found in the more advanced grinders where some of the grinders have a cleaning mechanism or have tools that clean the machines in the hard-to-reach areas, hence it becomes easy for the user to maintain the grinders, as it saves time. All this apart from the fact that these improvements also save the user from loss of income during the period when he or she would be cleaning or servicing the equipment. Such users must make all necessary consultations through equipment manuals and producer directives on the proper handling, operation, and maintenance of the machine in question.
Comparison of Top-Rated Meat Grinders
- Brand A Electric Grinder
- Motor Power: 1500W
- Material Quality: Stainless steel components with high durability
- Key Features: Multiple grinding plates, efficient reverse function, self-cleaning design
- Pros: High performance for large quantities of meat, easy to clean
- Cons: Higher price point compared to other models
- Brand B Manual Grinder
- Material Quality: Heavy-duty cast iron construction
- Key Features: Compact design, ideal for small-scale use, adjustable settings
- Pros: Budget-friendly option, no electricity needed
- Cons: Slower operation, physical effort required
- Brand C Multifunctional Grinder
- Motor Power: 1200W
- Material Quality: Aluminum alloy body with reinforced blades
- Key Features: Interchangeable attachments for grinding, sausage making, and more
- Pros: Versatile functionality, mid-range price
- Cons: Slightly bulkier design may require more counter space
Compare Common Types of Top-Rated Meat Grinders
|
Type |
Key Features |
Pros |
Cons |
Ideal For |
|---|---|---|---|---|
|
Manual Meat Grinders |
Hand-cranked, no electricity needed |
Portable, budget-friendly |
Labor-intensive, slower processing |
Small quantities, occasional use |
|
Electric Meat Grinders |
Powerful motor, automated grinding |
High efficiency, faster output |
Requires power outlet, higher cost |
Regular usage, large quantities |
|
Commercial Meat Grinders |
Heavy-duty motor, industrial design |
Handles heavy loads, durable |
Bulky, expensive |
Professional or industrial settings |
|
Stand Mixer Attachments |
Compatible with kitchen stand mixers |
Multi-functional, compact |
Limited power, slower performance |
Home cooks with stand mixers |
|
Mincers with Reverse Mode |
Reverse function prevents clogs |
Easy maintenance, fewer jams |
May be expensive |
Consistent grind, hassle-free use |
|
Sausage Stuffer Combo |
Includes sausage-making attachments |
Multi-purpose, convenient |
Can be complex to assemble |
Homemade sausage preparation |
Performance Metrics and Suitability
Examining the performance parameters of the best grinders for meat, a few features have to be understood to decide on a particular machine’s appropriateness. Among the most prominent ones are: power of the motor, capacity for grinding, working material protective properties, and ease of operational repair. Grinders of 350 watts or more often have a fixed structure and are capable of heavy-duty operations; hence, they are convenient for restaurants or where grinding is more frequent. Also, the rate at which the meat can be ground is another crucial parameter which can be expressed in lines per minute. Combinations of 3 pounds to 5 pounds are available for use in professional-grade grinders. And for wear and tear, stainless steel engineering is acceptable because it is resistant to corrosion activities and it is workable, in terms of reducing its wear, over a long period.
In addition, it is advisable to provide some of the parts that need to be replaced during the procedure, such as the removable parts, elements that are easily joined, and those that are in normal parts of the equipment. In case of household use, low power and low volume models are most suitable,, n both forms performing at the highest standards available, with some level of inconvenience in usage. Shredding blades for green (an example of such a blade is a tearing blade mainly used for meat with vegetables or fruits) and agitators are the last but not the least enhancements that are available on the product and improve its workings. By pinpointing these issues in consideration for most endusers will help in choosing the best value and cost effective appliances for various needs of grinding.
Recommendations Based on Budget and Needs

- Budget-Friendly Options
For farmers, the manual is a cost-effective tool to process small quantities of meat. This is because small meat grinders would be required to meet their small meat processing needs, and they usually have simple do-it-yourself cleaning and maintenance protocols.
- Mid-Range Options
If your needs are increased and you are to use the meat grinder for commercial purposes, you can opt for low-tier electrical grinders. These grinders come with more strength, a multiple set of grinding plates, and even some attachments for the grinder all without a significant hike in the price.
- High-End Options
For very demanding applications or in professional settings, state of the art meat grinders with powerful motors, a chassis made of stainless steel and sophisticated functionalities is the way to go. These types of models are long-lasting and high performing hence they are of good value to persons who do a lot of grinding work.
Affordable Options for Beginners
For people who are not used to meat grinding or are just looking to invest in a cheap solution for it there are a few that will suit others’ pockets. These types of grinders are typically made out of light materials such as plastic or aluminum, so that the machine can be as cheap as possible while catering to light or, at most, moderate loads. Also, such food equipment has a low difficulty level as learners can handle it without experience, owing to the availability of a basic grinding plate within the grinders, simple adjustments, among other things. However, for all these reasons, one can alternatively use manual and comparatively less powerful electric models to accomplish similarly small projects as meat processing.
A few other models in this group could be bought for somewhere between $50 and $150 and have a few gram controls, reversible functions to avoid choking the machine, and a low-end sausage-making accessory or stuffing kit. These options do not compare to commercial-grade equipment in terms of steam and ease of use, but they provide the perfect solution to learn as one is introduced to grinding meat. In order to acquire a cheap grinder, you are encouraged to get a model that is easy to put together and to clean, so as to get rid of the glaring types of challenges.
Mid-Range Choices for Hobbyists
Mid-tier meat grinding machines allow for an in-between purchasing decision that does not break the bank while providing additional features to those seeking more than a basic unit, durability, and agility. These products are equipped with powerful motors, with most having between 500 and 1,000 watts, making it easier for them to handle bigger food preparations. Additionally, many mid-range options include a number of different-sized grind plates, enhancing accuracy to perform different dishes such as fine or even medium sausages and coarser meat for dishes such as chilli sausages.
Some mid-priced grinders are also equipped with backspinaturators to sausages, which overcome any obstruction, hypoallergenic, austenitic-gathering, and ergonomic. inox steel material, and hands-free in design. It is possible to see other fittings such as kibbeh stuffers, juicers, etc., in imported products which are intended to satisfy the dietary preference of a food professional who is interested in preparing various types of foods. To get the correct mid-range grinder, the directive is to buy a solid one with a good, smooth, and imaginative design, even rotors chamfered at 45 degrees without any energy loss, in simple words.
High-End Models for Frequent Users
Top-of-the-line units are made for hardcore or professional use for those users or businesses that need their machines to work extremely well and last a long time. In view of extended service and installing stress, these grinders are usually constructed with high-grade stainless steel that serves them for a long time without rusting, haze, or abrasion damage. The majority of them come with very powerful windings with power going up to more than one kilowatt, ensuring easy operation, even for processing meat or other materials that are a little hard to grind. These units are equipped with advanced cooling solutions that help against overheating problems that might be prolonged due to their use.
Most high-end grinders also feature precision-machined gears and noise-cancelling technology to smooth the working process with as little interruption as possible. Other creative features could be the inclusion of detents to stop the grinder at some points in order to remove blockage, and a means of adjusting grind size. There can be additional such gadgets that serve other purposes and use cases, such as high-refutation mergers preparations. Entrepreneurs with the above freight qualities are fewer, implying that work is available for reduction solutions that are more innovative and yet acceptable and suitable for use by anybody. The units in question take several years to take the aforesaid form and are made with the intention of meeting the hatred but also the desire for high-volume use or niche food preparation work.
Practical Tips for Using and Maintaining Your Meat Grinder
- Pre-Chill Your Grinder and Ingredients
To make sure you have the best possible results, ensure that your grinder components like the blade and the plate are cold to any level before using them, and ensure that your meat is partially frozen as well. This will stop any smearing that might cause irregular cuts.
- Cut Meat into Small Chunks
In the interest of time and efficiency, cut down the excess fat, trim the sinew, and if necessary, concoct the meat to a manageable expanse in usual sizes of between 1 inch and 2 inches.
- Use the Correct Plate Size
Ensure you choose the cutting plate which produces the texture that you desire – whether to go with a coarse, medium, or fine texture. This helps in both avoiding putting too much strain on the motor and keeping the results consistent.
- Clean Immediately After Use
Clean the grinder entirely by taking it apart and using hot soapy water to clean all parts. All the parts need to be dried completely to avoid rusting and prevent the growth of bacteria.
- Lubricate Metal Components
Cleaning Techniques for Longevity
In order to maintain the performance of your grinder and also to prolong its durability, a number of advanced cleanliness techniques that provide a high level of cleanliness should be undertaken. In other words, the take on deep cleaning is also a requisite. This should start with any residues that have been left on all moving parts, any surfaces, especially the crevices and the corners, which can reduce their effectiveness or functionality. Here, the assistance of special brushes can be highly beneficial; either those meant for washing appliances or interdental ones will be effective in accessing some places. In the case where the machine is often used with hard water or some acidic liquids, regular use of descaling liquids should help removing the sediments that usually accumulates in the components of the machine hence preventing them from blocking. In case of any appliances that operate by use of electric current, it is important to maintain their cleaning by only using smooth or soft cleaning agents and avoiding any moisture areas like the motor housing.
It is suitable to keep the grinder in a chamber that doesn’t have much moisture. Encase or damage the machine in such a way that the metal parts that are exposed are not made of metal to avoid getting dust that can stick onto them. It is important to conduct aftermarket inspections to check worn-out or broken components, such as the seals, gears, or fastening components, to address these issues before they escalate to a failure of the system. All these preventive measures, as stated above, combined with the recommendations from the manufacturer, should ensure that the grinder continues to perform efficiently over a prolonged period.
Proper Storage Solutions
Reference Sources
-
The Best Meat Grinders, Tested and Reviewed
- This article reviews various meat grinders, focusing on their efficiency and suitability for processing deer meat. It highlights the importance of wattage, recommending 500 watts as a benchmark for grinding deer-sized animals. The piece also discusses features like durability, ease of cleaning, and grinding capacity.
-
Meat Grinder Recommendations on ArcheryTalk
- This forum thread features user recommendations for meat grinders, with Hobart being a popular choice for its reliability and performance. Users share personal experiences, such as grinding multiple deer annually, and emphasize the importance of motor power and build quality.
Frequently Asked Questions (FAQs)
Q: What is the best meat grinder for deer processing?
A: The best meat grinder for deer processing is typically one that offers a powerful motor, durable construction, and efficient grinding capabilities. Look for models with at least a 1 HP motor, as this provides ample power to handle tougher cuts of meat. Stainless steel components are also important for durability and hygiene. Additionally, consider features like multiple grinding plates for different textures and a reverse function to clear clogs. Brands like LEM, Weston, and STX International are often recommended for their quality and reliability.
Q: How do I choose the right size meat grinder for deer?
A: Choosing the right size meat grinder for deer depends on the volume of meat you plan to process. For occasional hunters, a smaller grinder with a capacity of 300-500 pounds per hour may suffice, while those who process larger quantities regularly should opt for commercial-grade models that can handle over 1000 pounds per hour. Additionally, consider the size of the feeding tray and the grinding head. A larger grinder allows for more efficient processing, especially if you’re grinding large batches at once.
Q: Are electric or manual meat grinders better for deer?
A: Electric meat grinders are generally better for deer processing due to their efficiency and ease of use. They can handle larger quantities of meat quickly and with minimal effort compared to manual grinders. However, manual grinders can be more portable and require no electricity, making them a good choice for remote locations or small batches. If you frequently process deer, an electric grinder with a powerful motor will save you time and effort, while a manual grinder can be a useful backup option.
Q: What features should I look for in a meat grinder for deer?
A: When selecting a meat grinder for deer, important features to consider include motor power, grinding speed, and the materials used in construction. A grinder with a metal housing and stainless steel components will be more durable and easier to clean than plastic counterparts. Look for models that come with multiple grinding plates for different textures, as well as sausage-making attachments if you plan to make sausage from your deer meat. A reverse function can also be beneficial to prevent jams during processing.
Q: Can I grind bones with a meat grinder for deer?
A: Most standard meat grinders are not designed to grind bones, and attempting to do so can damage the machine. However, some heavy-duty models specifically marketed for game processing can handle small bones, like those found in certain cuts of deer. If you plan to grind bones, ensure that the grinder is rated for such use and check the manufacturer’s guidelines. Alternatively, consider a dedicated bone grinder or a meat grinder with a bone grinding attachment to safely process bones without risking damage to your equipment.


