
Available without any attachments, KitchenAid Mixer Meat Grinder is the go-to item for any serious caters or aspiring chefs due to its numerous cooking conveniences. The most popular is when it is used to grind meat for burgers, goodges, or for creating different flavored sausages. However, this Meat Grinder Attachment can do a lot more than just bolster the cutting capability of a KitchenAid mixer. There are as well-step by step guidelines to using the product and its key features, how to assemble the parts, store, clean, and in which occasions one should use it. After this session, one will have ideas in regard to the usage of this powerful accessory and how it can be employed in enhancing the quality of foods served.
Understanding the KitchenAid Meat Grinder Attachment
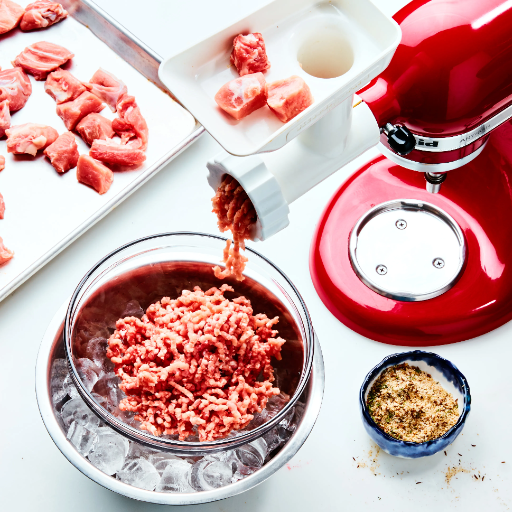
KitchenAid just being an efficient Mixing requires positive elaborations to the latter for example for the case of interchanging, mixing of graving sausages and also every other possible commodity. The fashioning of the first few pieces: the body made of solid metal to increase its resistance to wear and protect the motor driver, the cutting knife, the grind plates, and the pushers of food. It actually hooks to the upper front position of the Kitchen Aid stand mixers and works by the motorized functionality within the mixer itself. All in all, the attachment is very user-friendly and allows the user to adjust and control the ground food texture in whatever way he/she want. The use of pans, picnicware, comfort in carrying and safekeeping the items become easy even for children in the house due to the material used—plastic, which is resistant to heat and water, and this makes these items suitable for outdoor activities.
What is a KitchenAid Meat Grinder Attachment?
The purpose of the KitchenAid Food Grinder is to enhance the multi-functionality of your service mixer by turning it into an advanced grinding machine. For example, it uses the motor of the mixer to turn an inner auger and thus forces the food into a grinding plate of the required caliber and grinds it. The texture of the ground meat, for example, can be coarse, medium or fine depending on the number of grinding plates available.
This particular grinder is well-suited where grinding is necessary like in the preparation of such any kind of meat including beef, pork, chicken, etc., and other food as vegetables, cheese, or crumbs. In more advanced models, some of the components even include a sausage-making feature so that even beginners can immediately stuff sausage without any hassle. As a result, this tool substantially eases the process of preparing dishes and allows control to be maintained over the quality and texture of the elements as well as the degree of fat considered, which is why even chefs and household cooks want this accessory in their collections.
Benefits of Using a Metal Food Grinder Attachment
- Enhanced Durability and Longevity
These food grinder extensions incorporated in the stand mixers are prepared with qualities such as stainless steel and cast aluminum, thereby making them resilient unlike the ones made out of plastic, which are susceptible to damage quicker. The fact remains that this configuration is practical because it covers the possibility of frequent utilization and incorporation of more hard materials such as muscles of animals in grinding with less likelihood of such materials causing damage or distortion of the attachment.
- Improved Grinding Precision
As a construction, metal assures authority and consistency owing to which applicable meat and other additives can be qualified into use. Often, there three or four grinding plates are provided, and then every cook will be able to make coarser or finer mincemeat according to a relevant recipe for, say, beef burgers even finer for use in pâté preparation.
- Better Hygiene and Easy Maintenance
The attachments made of metal cannot be stained and do not retain any odors that might be left by the foods they have been used to prepare inside them. Their impermeable surface structure facilitates better cleaning leading to the lesser prevalence of bacterial contamination. Further, such grinders are normally washer-proof, thus making the obstruction to cleanliness much less while still ensuring that neat food is prepared.
- Greater Versatility in Food Preparation
In addition to grinding meats, the metal food grinders have the ability to grind other foods such as vegetables, nuts, fruits, insects, meat bones etc. With the help of other such tools, e.g., sausage-making tubes or pasta-making discs, these tools also assist home cooks on how to go about making ‘personal’ sausage, pasta, or step-by-step meat-out meals. After this session, one will have ideas in regard to the usage of this powerful accessory and how it can be employed in enhancing the quality of foods served.
- Control Over Quality and Nutrition
Another great advantage of food grinding at the house is that so many times it produces foodstuff that is of so much higher quality in so far as it is concerned with the quantities of sub-standard components like fat and chemicals used in processing the food. This is especially helpful for those with certain dietary restrictions or who are looking for healthy alternatives; women, mostly, or everyone, who more considerably avoid chemical preservation or high fats in most of the pre-packaged foods.
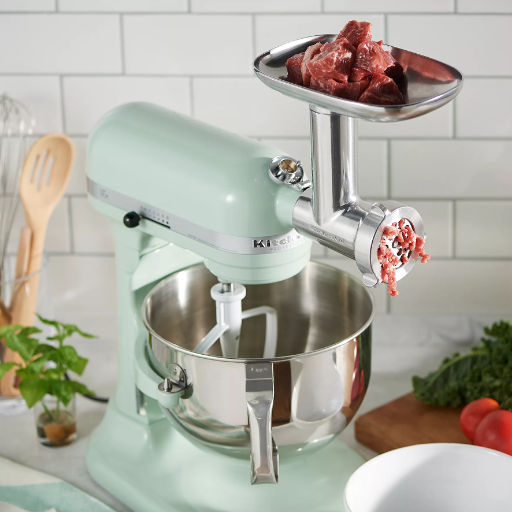
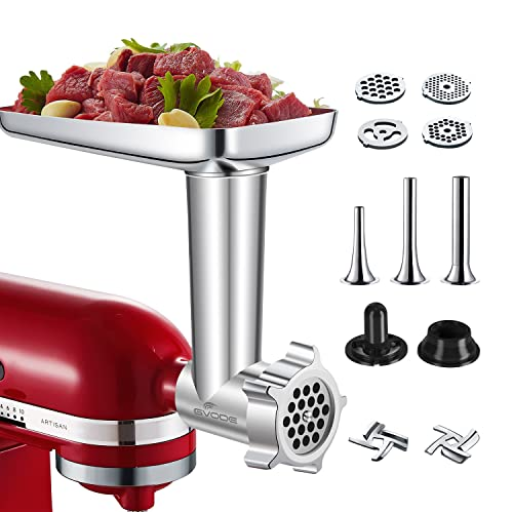
Components of the KitchenAid Meat Grinder
- Housing Body
A clamp shell guarantees to encapsulate the program parts, usually out of long lasting materials as upgraded plastic or stainless steel thereby ensuring its lifespan and low maintenance.
- Grinder Plates
The fields contain perforated rings that have openings of different diameters say smooth, medium and coarse ones for different textures and cuisines to be prepared, such as grinding, for example, meat, vegetables or even bread crumbs which provides greater freedom in grinding.
- Cutting Blade
There is a steel disc fitted with cutting edges that cleanly separates all the components as they pass through it with through the grinder plate optimizing the outcome.
- Food Pusher
It is a small food pusher that aids the user in feeding the ingredients conveniently into the meal grinder without messing with the grinding operation in progress or causing food to get stuck in the mechanisms easily.
- Auger (or Screw Conveyor)
The moving part having a helical shape that transports the foodstuff efficiently from the hopper to the cutting and grinding modules.The screw worm helps in avoiding blockages, resulting in a smoother operation.
- Hopper
The hopper is a part of the machine that allows the meat to enter the grinding chamber, and it is also a base, which means that it should be able to keep the food that enters steadily in the hopper, less skilled and better designed than the more advanced varieties.
- Attachment Hub
The hub kit has no issues being mechanically fastened to the kitchen aid, and it is the place where the grinder derives power for the mixer.
- Wrench or Tool (Optional)
Some models include a wrench or tool for helping tighten or loosen the grinding wheel, in order to facilitate proper assembly and cleaning of the appliance.
How to Use the KitchenAid Meat Grinder Attachment
- Prepare the Stand Mixer
Affix the grinder to the power hub of the mixer by aligning the accessory or the mincer with the hub and turning the fastening knob about 45 degrees to the right.
- Assemble the Grinder
Minced meat is to be provided in the cylindrical chamber, and therefore, the pusher is to cut the meat as low as possible. Further, the user can select a blade according to the type of material to be minced from any of the thin or thick grinding plates and tighten the locking nut.
- Prepare Ingredients
Cut the meat or preparation as appropriate in order to make it small enough to feed it into the grinder easily. All meat should be ground under internal parts automatically especially when it is cold because it enhances the grinding speed.
- Start Grinding
Switch on the stand mixer at the recommended rate of motion usually set at number four. To help, buy a food press with the set to make it easy for ingredients to travel inside the vessel.
- Clean After Use
Clean the grinder, and its everything in warm soapy water. Afterward, rinse and then dry everything to avoid moisture conducive to rust. Mind you, some parts are machine washable, all you will need to consult the instruction manual.
Preparing Different Types of Meat for Grinding
- Beef
In order to make beef dry sausages, pork back fat or a little pork rind is added to the lean meat in certain ratios in order to attain the needed fat ratio and soft texture. Block the excessive fibers in the cuts of beef with hard connective tissues like those from the chuck and the brisket to avoid blockages in the grinder. With the help of a sharp knife, cut the fresh meat to around 2.5-4 cm length (about 1 inch) large squares, in a tray and let it chill, because cold meat achieves better grinding results, and significantly eliminates smearing from occurring.
- Pork
For the purpose of preparing recipes containing pork, shoulder and belly are both viable options as they tend to have just the right fat content and thus ideally suited to making sausages. Get rid of anything which is stoney hard or cannot be rendered edible by any method on the inside. When preparing the pork to be ground later, treat it in the same way you do the beef but the pork, being softer in bits, will block after a short time, plus the propensity to smear is greater in this case.
- Poultry
When handling poultry during processing, it is important to be able to take reasonable steps to reduce any possible health hazards that may result. Choose boneless skinless parts such as chicken thighs, or turkey breasts, which are cut into sections, cut off the existing fat, excessive as well as sinew. Apply the meat without defrosting it completely to the grinder because the meat is likely to stick which can smear the ground meat of the poultry when this is too warm.
- Lamb
Any loss in beef’s strength is substituted by lamb whose heavy and strong flavor fits perfectly in dishes loaded with spice like stuffed kabab or sausage. Which areas, like the shoulder and legs, possess such cuts but are trimmed of unnecessary fat, especially if the dish is gravied. Let the meat be frozen for an hour or so and then cut into even blocks for processing.
- Game Meats
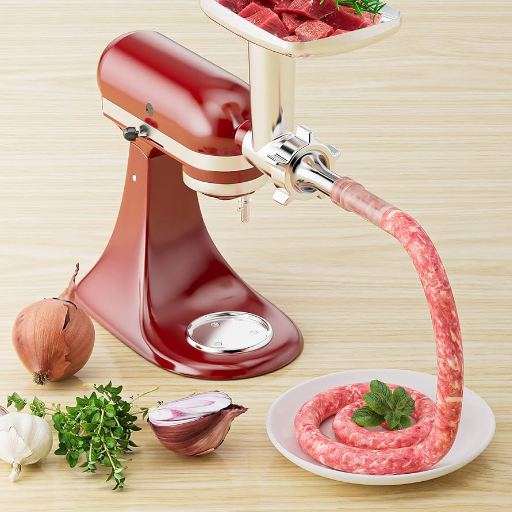
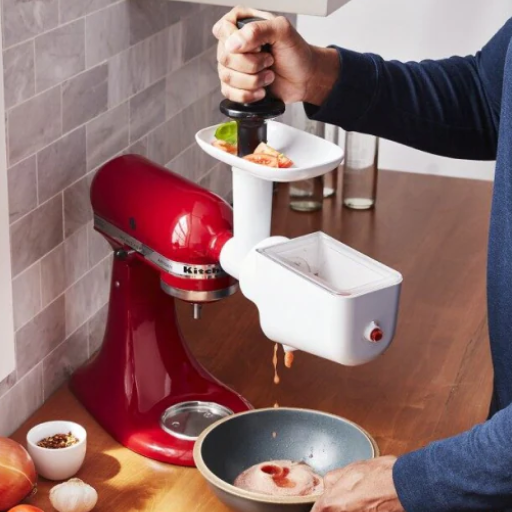
Using the Sausage Stuffer Attachment
Making sausages at home with a homemade sausage stuffer attachment is a must when one needs a consistent product. To start with, the operating manual should be checked; it will assist in the assembly and cleaning of the stuffer. For this particular model with this 3.8” opening, I am using fibrous artificial casings. These are hard plastic casings that are soaked in hot water before tying the ends. Slowly turn the crank to stuff the mixture into the casing. Avoid trapping any air between the casings and the mixture. Prepare another casing to properly tie or twist the sausages.
Pre-mixed and refrigerated sausage fillings should be fed into a suitable extruding apparatus to carefully avoid the presence of air-every cook’s nightmare. While attaching the casing on the supporting tube, some casing should be left hanging in order for the sausages to enable handling reached by tying (or twisting) of the sausages.
Set the stuffer on as slow a pace as possible with no jerky fast movements when the material falls down into the casing, so as to prevent overstuffing, which would mean that the casing would burst during stuffing. And when the casing is full, turn it at regular intervals to make sausage links in case you aim to make some. For the purpose of caring for quality and food safety, it is advisable to refrigerate or freeze the sausages immediately, unless they are ready for dinner or curing. A sausage cook need not worry since the meat is there and as one of several technological holds, it is the sausage stuffing attachment.
Maintenance and Care for Your KitchenAid Meat Grinder
To ensure maximum efficiency of your kitchenAid meat grinder device and that it serves you for a longer period, one has to ensure proper maintenance practices. The first maintenance step involves disassembling the grinder completely to facilitate the separation of the removable components, knife, plate, and feed tube. To rid them of meat residue, scrub with soapy water gently. The components need to be washed under running water and should be scrubbed using dish soap and non-abrasive brush especially the areas where food debris can get hidden. Soaking in water is not recommended for long periods especially for metal parts since it may cause rust.
Remember that the grinder parts need to be thoroughly dry before putting them back together in order to eliminate any chances of rusting. Metallic parts should also be lubricated, particularly the blade and plate, through application of food-grade mineral oil to keep them more slippery and less prone to rust. Keep it stored in a dry and cool place to disinfect the metal rim.
Always check the blades and plate in the grinder on a regular basis, particularly if they are used more frequently, to avoid blunt edges that might block them from functioning accurately and sharply. Dispose of the parts where it is necessary to maintain the equipment’s operational capability. These maintenance tips will ensure that even after so many years of service, the KitchenAid meat grinder will still be useful.
Cleaning the Metal Food Grinder Attachment
Most importantly, keep in mind that if you want to keep using your KitchenAid Stand Mixer Meat Grinder Attachment for a long period of time, you must keep it clean as often as possible. It is prudent to completely dismantle, after use, or when needed, every part of the machine including but not necessarily limited to the grinding plates, blade and the worms (auger.) Clean each piece, submerged in warm soapy water after disassembling it, in order to remove the food residue. Use a mild detergent in conjunction with a soft brush to clean all food-accessible areas very well, especially the hard-to-reach spots. Remember not to leave the parts for an extended period of time, as soaking may accelerate rusting and particularly on the metallic parts.
When all the parts are so clean, drying ought to be done quickly in order to prevent moisture and oxidation in the metallic components. To reduce unnecessary wear during the intermediate periods of maintenance and protect the surface, always apply a food grade mineral oil coating to the blade and grinding plates. If an individual does not have a dishwasher, the grinder body and removable parts should be cleaned manually. Maintenance mainly serves to maintain proper operations of the machine increasing its safety in dealing with food by reducing microbial contamination.
Proper Storage Techniques
For long-term storage and performance of the unit, correct shelfing techniques are needed. It is always advisable that after all equipment assembly and drying processes, every warrantable part should be shelved in a cool, dry space to prevent unnecessary moisture which may end up in corrosion or mildew formation. One effective storing technique is to place a grinder back in a box disassembled which enhances the longevity of its movable components. In particular for smaller unit attachments like screws, plates or blades, it is beneficial to place them in some sort of an airtight container or a sealed bag so as no external contaminant or air humidity would cause damage to the parts. For some grinder components like cast iron or carbon steel, it is advised to also apply food grade mineral oil to deter further corrosion during the storage period. Before reassembling the device and making it operational, always carry out a visual inspection of the device to make sure there are no signs or wear or damage in the parts.
Choosing the Right KitchenAid Meat Grinder Attachment
Comparing Different Models of KitchenAid Meat Grinders
|
Model Name |
Material |
Motor Compatibility |
Grinding Plates Included |
Accessories |
Price Range |
Notable Feature |
|---|---|---|---|---|---|---|
|
Metal Food Grinder |
Durable metal |
All KitchenAid models |
Fine, medium, coarse |
Sausage stuffer kit |
$80–$100 |
Rugged build, high performance |
|
Food Grinder Attachment |
Plastic housing |
All KitchenAid models |
Coarse, fine |
None |
$50–$70 |
Lightweight, basic functionality |
|
Meat Grinder Kit |
Stainless steel |
Pro-Line, Artisan series |
Fine, medium, coarse |
Sausage attachments |
$70–$90 |
Versatile grinding options |
|
Stand Mixer Grinder Pro |
Plastic and steel |
Tilt-head models |
Fine, coarse |
Food pusher |
$60–$80 |
Easy cleaning, ergonomic design |
Pros and Cons of Using a KitchenAid Meat Grinder
Pros:
- Longevity: KitchenAid meat grinders provide the capability to grind different cuts of meat as well as some other ingredients such as vegetables, cheese, nuts, etc. Some advanced kits also include sausage-making attachments, thus reinforcing the utility even further.
- Personalisation: Here, users get the freedom to determine the grind size, with the help of adjustable plates which enable them to make fine, medium, or coarse grinds depending on the specific requirements and the prescribed method in preparing the dishes.
- Functional: The main objective of providing attachments is to enable an easy installation and connection with the respective KitchenAid stand mixers and as such; there is no need for additional appliances.
- Sustainability: KitchenAid models that are made of materials like stainless steel are better when it comes to sustainability, this is because there is enhanced endurance on the materials which is crucial in ensuring durability even in constant use.
- Usage is cheap: One advantage of grinding meat at home is the reduced cost of the process as oppose to purchasing read meat. Also, it reduces the risk of consuming unwanted materials as it provides a chance to the user to put all the desired contents in.
Cons:
- Other KitchenAid attachments not included: These accessories need its compatible KitchenAid stand mixer to be functional hence uncomfortable for people who do not owe this appliance.
- Manufactured with Plastics (some models): Other models, which are cheaper, to use plastics to make the housing, are of course less robust and will breakdown much faster under constant use.
- Dedication: Maintenance of the grinder will be slow as there will be time taken to dismantle and clean the grinder parts.
- Overheating: Committed grinding of, say, an hour or so may cause overheating, which will, in turn, diminish the performance and useful life of the grinder.
Maximizing Your KitchenAid Mixer Meat Grinder Experience
The following ideas are essential in order to unlock the potential of a KitchenAid mixer grinder attachment:
- Pre-chill Components: Chill the grinder, the meat and the plates itself, and the blades too as well, in the refrigerator. The cold components reduce heat expansion and keeps the meat fresh; also reduction in the motor resistance.
- Cut Meat Properly: Significantly reduce the size of the cut pieces and uniformity when cutting the meat and also before grinding so as to eliminate or reduced seriousness of cases which the motor may get burned very easily and thus over stressing it.
- Use the Right Speed Setting: This may be counter intuitive but you may need to operate at rather medium speed for the majority of grinding jobs since it will give you the best result and is easy to control.
- Clean Immediately After Use: Cleaning the pieces part of the attachment is recommended after every use. The attachment should be set apart and all the components washed well with warm soapy water and dried when not in use, in order to prevent the stickiness of the parts which might bring about any undesired stain.
- Inspect Blade Sharpness: Inspection of the blade for dullness is the purpose of the system this is another step that should be taken. Enquire how well the blade has already been used and sharpen this to enable the continued function and performance of the system.
By following these principles, you will be able to multiply the potential and longevity of your meat grinding attachment.
Tips for Efficiently Grinding Meat in Batches
- Pre-Chill Tools and Ingredients: Precool the grinder attachments ( the blade, plate and grinding head ) and the meat in the freezer for at least 30 minutes before you grind it in the machine. By doing so, you prevent the fat from the meat steaming and streaking so you will have a cleaner and more palatable grind.
- Cut Meat into Uniform Cubes: All about prepping the meat for grinding would include cutting the cracks into small relief squares – Yields about an inch and a half’s cube. As there is a necessity to use the machine even and smooth surfaces are needed as the odds are that the machine would stick in the first place.
- Grind in Small Batches: Prepare the meat in decreased amounts -approximately 1 to 1.5 pound pieces- limiting the use of the grinder so that there is no overflow and the process grinds in a lower time without any delays which could even cause overheating. The above method effectively ensures that the quality of your plate is kept high.
- Alternate Between Lean and Fatty Cuts: To acquire the best possible balance of smoothness and potency, alternate grinding excessive and inadequate meat cuts into the machine. Is meat with 20% fat content the best for making juicy hamburgers? An average fuss has recommended the top 4 parts of leanness with one part of fat in the compound.
- Use the Correct Grinding Plate: When preparing meat dishes, be sure to select the appropriate square hole grinder plate for the type of recipe being processed. For example, for drier preparations such as chili beef or any other type of stew, a bigger hole (e.g. ⅜ inch) is preferred, whereas finer points (e.g. 3/16 inch) are preferred for making meatloafs and sausages.
Pre-Chill Your Meat for Better Results
Reference Sources
-
KitchenAid Metal Food Grinder Attachment – KitchenAid Canada
- Summary: This page highlights the KitchenAid Metal Food Grinder Attachment, which connects to the power hub of any KitchenAid Stand Mixer. It allows users to grind fresh ingredients like meats, hard cheeses, and bread crumbs. Key features include fine, medium, and coarse grinding plates, sausage stuffer tubes, and a larger food tray for processing more ingredients in one batch.
-
KitchenAid Metal Food Grinder Attachment on Amazon Canada
- Summary: This Amazon product page describes the KitchenAid Metal Food Grinder Attachment as a durable, all-metal accessory for KitchenAid mixers. It includes grinding plates, sausage stuffer tubes, and a food tray. Customers praise its performance, ease of cleaning, and quality. The grinder is ideal for making sausages, burgers, and other fresh dishes at home.
-
KitchenAid Metal Food Grinder Stand Mixer Attachment – Canadian Tire
- Summary: Canadian Tire’s product page showcases the KitchenAid Metal Food Grinder Attachment, emphasizing its ability to grind various meats and prepare gourmet dishes. It features multiple grinding plates, sausage stuffer tubes, and a large food tray for efficient processing. The grinder is designed for easy attachment to KitchenAid mixers and includes a storage case for convenience.
Frequently Asked Questions (FAQs)
Q: How does the Kitchen Aid mixer attachment for meat grinding work?
A: The meat grinder attachment for the Kitchen Aid stand mixer uses the power of the mixer to grind various types of meat. Simply attach the meat grinder to the front of the stand mixer and feed your favorite cut of meat through the food tray. The metal food grinder attachment includes 4 grinding plates that allow you to achieve different textures, from coarse ground beef for burgers to fine ground chicken for sausages. By maintaining a cold grinding temperature, you ensure the best texture and flavor. It’s also easy to clean, making it a convenient tool for your kitchen.
Q: What types of meats can I grind with the Kitchen Aid mixer meat grinder?
A: You can grind a variety of meats with the Kitchen Aid mixer, including beef, chicken, and pork. The grinder attachment is perfect for creating gourmet burgers or breakfast sausage using your choice of cuts. If you’re interested in making sausages, the included 3 sausage stuffer tubes make the process straightforward and efficient. Additionally, you can grind hard cheeses with the metal grinder, making it a versatile kitchen tool. Whether you’re preparing for a family meal or grinding large quantities for a gathering, the meat grinder food attachment is up to the task.
Q: Can I pre-chill meat before using the Kitchen Aid stand mixer meat grinder?
A: Yes, pre-chilling your meat before grinding is highly recommended to achieve a clean grind. Keeping the meat chilled helps maintain a cold grinding temperature, which is crucial for preventing the fat from smearing and ensures the best texture. You can easily place the meat in the freezer for about 30 minutes before grinding. This practice not only enhances the grinding process but also improves the flavor of your final product. By following this tip, you’ll find that your ground meat is more consistent and easier to work with.
Q: Is the Kitchen Aid metal food grinder attachment easy to clean?
A: The Kitchen Aid metal food grinder attachment is designed for easy cleaning. Most parts are dishwasher safe, making cleanup a breeze after you’ve ground your meat or other foods. However, for best results, hand washing the components with a cleaning brush is often recommended, especially when dealing with sticky or fatty residues. This will help maintain the longevity of your attachment. Overall, the convenience of cleaning the mixer attachment allows you to focus more on preparing delicious meals without worrying about complicated maintenance.
Q: What is included with the Kitchen Aid stand mixer food grinder attachment?
A: The Kitchen Aid stand mixer food grinder attachment typically includes 4 grinding plates and 2 grinding blades, allowing you to achieve various textures for your ground meat. It also comes with 3 sausage stuffer tubes to help you make homemade sausages with ease. The attachment is compatible with all Kitchenaid® stand mixers, making it a versatile addition to your kitchen. Whether you’re grinding meat for burgers or making your own breakfast sausage, this attachment simplifies the process and enhances your culinary experience.


