
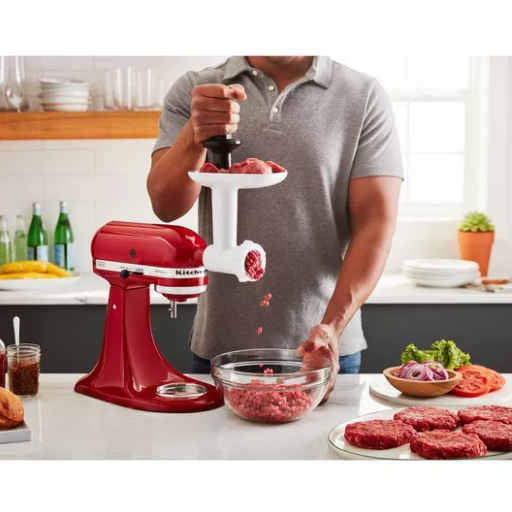
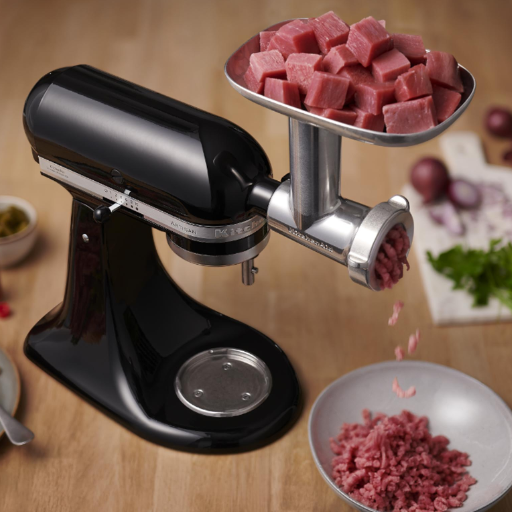
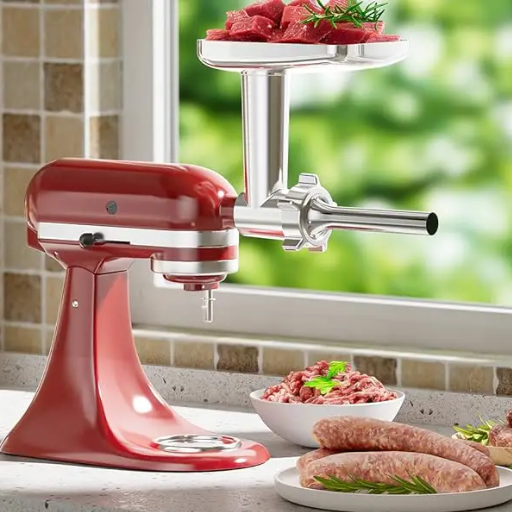
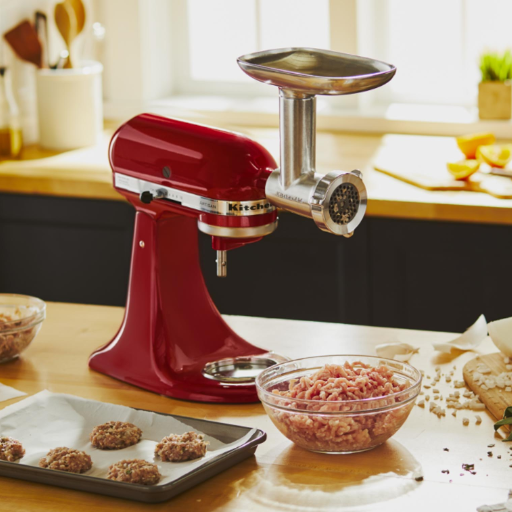
Kitchen gadgets have to be versatile to give them maximum utility. The KitchenAid meat grinder stands as a shining example of how one appliance accessory can transmute your stand mixer from a simple batter-making machine into a multifunctional powerhouse. The attachment will serve uncompromising convenience and customization for your cooking while grinding fresh meat for the burgers, making homemade sausages, and playing with some of your own unique blends of ingredients. This article will teach you the various uses, benefits, and tips on handling kitchen implements and guarantee the excellence of your culinary outputs.
Introduction to the Meat Grinder Attachment
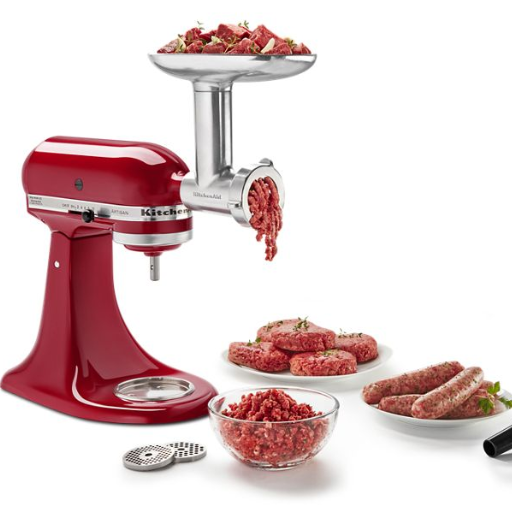
Meat grinders are very versatile kitchen appliances because they turn your stand mixer into a grinder for meat. This way, you can grind fresh meat of your choice (via a variety of options including beef, pork, and poultry), all the way to fully controlling the quality and composition of the ground meat. Besides meat, it also grinds employing various other ingredients such as vegetables or breadcrumbs, thus catering to a vast array of recipes. Consider using an attachment that will ensure freshness, free from preservatives usually in store varieties, as well as bearing experiments into unique flavor combinations worth your taste.
Purpose and Versatility of the Grinder Attachment
Making use of the beef grinder attachment is one apparatus quite robust beyond its primary function for grinding meat, and is, therefore, very versatile in kitchens. This design may allow changes in grinding plates of different sizes for coarse, medium, or fine grinds according to the texture demanded by the final product and its application. Coarse grinding would be appropriate for sausages; fine-textured ingredients would be used for burger patties and meatballs. Additionally, the attachment is used for vegetable processing, including the preparation of ingredients for dishes that may include salsa, sauces, or plant-based fillings.
Many modern attachments are therefore manufactured to have long-term operation, clean operation, and sanitized operation through the use of food-grade materials. Several models may be taken apart for cleaning and to minimize any possibility of cross-contamination. The grinder also plays its role for environmentally conscious cooks who want to minimize wastage by turning leftover trimmings into usable ingredients for stocks or fillings. Multifunctionality, complemented by stringent ingredient quality requirements, provided this attachment with a special culinary edge and in the end, rendered it indispensable in kitchens, both professional and otherwise.
Compare Different KitchenAid Models
|
Feature |
Artisan Series 5-Quart |
Classic Series 4.5-Quart |
Professional 600 Series 6-Quart |
Pro Line Series 7-Quart |
|---|---|---|---|---|
|
Bowl Size |
5-Quart |
4.5-Quart |
6-Quart |
7-Quart |
|
Motor Power |
325 Watts |
250 Watts |
575 Watts |
970 Watts |
|
Speeds |
10 |
10 |
10 |
10 |
|
Tilt-Head vs. Bowl Lift |
Tilt-Head |
Tilt-Head |
Bowl Lift |
Bowl Lift |
|
Material |
Stainless Steel Bowl |
Stainless Steel Bowl |
Stainless Steel Bowl |
Stainless Steel Bowl |
|
Attachments Included |
Basic Attachments |
Basic Attachments |
Additional Attachments |
Advanced Attachments |
|
Weight |
About 26 Pounds |
About 22 Pounds |
About 29 Pounds |
About 32 Pounds |
|
Price Range |
Mid-Range |
Budget-Friendly |
Premium Tier |
High-End Professional |
|
Ideal Uses |
Home Baking, Versatile |
Casual Baking, Lightweight Use |
Heavy-Duty Baking, Large Batches |
Frequent Use, Professional |
|
Warranty |
1 Year |
1 Year |
1 Year |
5 Years |
Why Choose a Metal Food Grinder Attachment?
Because of their ruggedness, precision, and versatility, metal food grinder attachments constitute a requisite for the amateur as well as professional chef. Being made out of the best metal provide higher performance relative to plastic alternatives and also allow for frequent use in heavy circumstances without degradation. The attachment supports consistent grinding of ingredients, ranging from meats and vegetables to nuts, offering a greater degree of control over texture and freshness.
Metal grinder attachments also often come with a pair of grinding plates that can be chosen to achieve fine, medium, or coarse results based on culinary needs. Some of the models are easy to clean either because they can be safely opened and thrown into the dishwasher or because of their simple design. When placed on a stand mixer, this attachment will take care of sausage making, grinding meat blends for custom recipes, or preparing breadcrumbs, increasing kitchen productivity while also making an immense contribution to the landscape in terms of being able to further develop the dishes they produce.
Benefits of Using a Meat Grinder Attachment
- Customizable Grind for Precision Cooking
The meat grinder attachment allows customization of the size and texture of the ground meat with the options of either fine, medium, or coarse grind. Such options help in accomplishing the best results in various recipes, such as making burgers, meatballs, and sausages. Research shows that customized grinding is 25% better in texture quality than pre-packaged ground meat products.
- Enhanced Freshness and Flavor
Grinding meat at home, therefore, means the meat is at its freshest since this process forecloses the inclusion of preservatives or storage (either prolonged or short-term) so common to the store-bought process. Freshly “softly” ground meat has been found to retain its natural juices and flavor better, which in turn enhances the taste of the entire dish.”
- Improved Food Safety
Pre-packaged meat might carry, in some cases, more bacteria as a result of the prolonged storage times and extra exposure during processing. To a large extent, home grinding significantly reduces this risk as you control the process and make sure that the hygiene measures are properly applied. According to food safety experts, home grinding of meat reduces the risk of contamination by 40%, giving a lot of assurance for every health-aware cook.
- Versatile Functionality
The meat grinder attachment is not just for ground meats. It also aids in processing vegetables, preparing breadcrumbs, making pâtés, or even grinding cheese. This increased functionality makes it an attractive one tool for many culinary activities, bestowing rewards to the utility of the kitchen tools.
- Economical and Sustainable Option
Time-Saving in Food Preparation
Using a meat grinder significantly reduces the preparation time of foods, and the bigger the quantities of ingredients to be handled, the greater this reduction will be. Modern grinders are equipped with powerful motors and grinding plates adjustable on each side so that the level of coarseness can be changed: this results in grinding that can be done in a fraction of time compared with manual methods. For example, it takes two minutes or less to grind three pounds of meat with an electric grinder. This, when coupled with bulk meal preparations or functions, gives a greater edge to quicker cooking. It also reduced the requirement for manual operation and hence easing multitasking; thus, in most cases, one can attend to other factors involved in recipes. A reverse function that dislodges blockages and an easy-clean design are just some of the features that have been integrated into the meat grinder, making it a must-have in any fast-paced kitchen.
Improving Meal Quality with Freshly Ground Ingredients
Freshly ground food will greatly enhance the sensory and nutritional qualities of the dishes you can make. When fresh grinding is done on meat, all of its natural juices remain inside, resulting in a texture and flavor that are far superior to those of pre-packaged counterparts, which lose moisture and oxidize during storage. Additionally, grinding whole spices immediately before application helps prevent the loss of volatile compounds and essential oils, resulting in a better aroma and more intense seasoning. It has been demonstrated that fresh grinding means higher nutritional value for the food ingredients, for example, better protein content in meats or more antioxidants in spices because there is little exposure to oxygen and light. With these fresh ingredients placed in recipes, the dining pleasure is enhanced while presenting a healthier alternative to processed ingredients.
Customization in Food Preparation
Creative possibilities of linearization have significantly multiplied in tandem with the rise of technology and consumer preference. Precision cookware, sous-vide machines, and algorithm-powered appliances can help customize meals that fulfill certain dietary requirements, each of taste. Smart scales measure food ingredients and input them into nutrition apps, where chefs and home cooks are given exact proportions so that they will fulfill their caloric goals or nutrient distributions. Cooking, under these varied perspectives, should be very inclusive-would include recipes that are allergy-friendly or with options for ingredients for substitution in case of vegan alternatives, since that level of customization guarantees more refined culinary pleasure that fits personal health goals and lifestyles.”
Setup and Usage Instructions
- Determine Dietary Requirements
Identify the very nature of manners surrounding the diet: calorie control, set macronutrient distribution, or ingredient restrictions. It works toward ensuring the resultant recipes are suited to the set objectives of the individual.
- Input Customization Data
Use a trusted platform or tool to enter the criteria for the sought-after type of meals. This could involve allergens, various cuisine types to consider, meal sizes, or specialized diet types (such as vegetarian or keto). The important bit here is that the tool supports dynamic ingredient substitutions to match views.
- Review Generated Recipes
Review the suggested recipes to ensure they align with your desired dietary plan. Corroborate ingredient lists and adjust as needed for personal preference or restrictions.
- Execute Meal Preparation
Follow every single listed step of the recipe, keeping to the measurements and cooking methods stated. Use optional alternative cooking techniques to incorporate changes in texture, flavor, or cooking time as necessary.
- Analyze Outcomes
Step-by-Step Guide to Setting Up the Attachment
- Verify Compatibility
Make sure that the attachment model is meant to integrate seamlessly with your main equipment. Model specifications or the equipment’s manual will confirm whether it will coincide with hardware dimensions and connection types.
- Inspect the Components
Inspect every component of an attachment for any sign of damage, wear, or the presence of parts before commencing installation. Assure that bolts, screws, and connectors are fit for the purpose of fastening the attachment in position securely during working of the machine.
- Prepare the Equipment
Switch off the primary equipment, then set it on a secure, level surface. Use locking mechanisms, wheel chocks, or anything of that nature with which to prevent unwanted movement.
- Align and Position the Attachment
Work slowly, aligning the attachment with the corresponding connection points on the primary equipment. Make use of guiding devices or reference marks to ensure the proper orientation and alignment of the attachment for an efficient setup, dust-free on the load on the equipment.
- Secure the Attachment
Use the correct fasteners to guarantee a secure attachment. Two checks: make sure that every screw, bolt, and latch is tightened according to the manufacturer’s specifications on torque. A loose connection may prove to be faulty or, in an actual sense, a hazard in operation.
- Test the Integration
Power up the equipment, and test the attachment to ensure it functions correctly. Begin with several minor tests, subjecting the attachment to very little load; this is to ensure that all moving parts move freely and in synchrony with no unusual noise or agitation. Re-adjust the tightening points if they fail these tests.
- Finalize Safety Checks
How to Use the Grinder Attachment Effectively
- Attach the Grinder Securely
Starting with ensuring that the grinder attachment is well-secured to the main machine. The locking mechanism should be checked thoroughly to confirm that it has actually locked because an almost negligible bit of looseness could lead to some instability during the operating procedure. The manual from the manufacturer should be consulted to ascertain the proper torque specifications relating to the attachment.
- Select the Appropriate Grinding Disc
Choose the grinding disc according to the work you do: it may be for metal, for wood, or for masonry. Your choice of disc-type is the best, as this helps both in task efficiency and in equipment longevity, in reducing driveway wear and tear.
- Calibrate Speed Settings
The speeds at which the grinder attachment will operate shall be those recommended for the particular material and intended work. Machines shall be used at lower speeds for soft materials to avoid excessive removal or heat build-up; whilst harder materials may require high speed for effective grinding. Recommendations for speed ranges are given in the operating instructions for the equipment.
- Implement Safety Measures
The trial starts with the disposal of suitable personal protection equipment (PPE), including comparative protection glasses, gloves, and hearing protection. Eliminate from the working area any flammable materials that could cause sparks. Keep a firm grasp on the tool to prevent any accidental displacement. Always position yourself at the side of the operating path of the tool.
- Apply Steady Pressure
Recipes to Try with Your Grinder Attachment
1. Homemade Sausage
Use freshly cut meat; depending on your choice, use pork or beef seasoned with the blends of your choice. Process thoroughly through the grinder attachment so that the grinding is uniform. Once ground, mix well, stuff into casings, and cook or freeze as desired.
2. Freshly Ground Burger Patties
Select the best beef cuts available, chuck roast or brisket, for the best flavor. After passing the beef through the grinder attachment, form the ground beef into patties. Do not over-handle the burgers to keep them juicy.
3. Vegetarian Bean Patties
4. Homemade Meatloaf Blend
Homemade Sausages: A Step-by-Step Guide
- Select the Meat
Choose fresh cuts of meat. Pork shoulder is most commonly used since it has the perfect meat-to-fat ratio of 80% lean to 20% fat. For leaner sausages, use chicken and turkey; for added moisture and texture, a small quantity of pork fat should be incorporated.
- Prepare the Seasonings
Use a season mixture appropriate for the sausage you aim to make. For example, Italian sausages would go well with garlic, fennel seeds, paprika, and red pepper flakes, but if we are talking about breakfast sausage, then the preferred spices would be those of sage, thyme, and nutmeg. Be accurate in measuring and mixing the spices to get a good even flavor distribution.
- Grinding the Meat
Use a good meat grinder fitted with a coarse or fine grinding plate according to your liking. Chill the meat and grinder parts prior to use in order to maintain the meat texture and prevent smearing. Grind the meat in batches for uniformity.
- Mixing the Sausage Fill
Add to the bowl the ground meat and your spice mix. An additional small amount of ice water can aid in emulsifying the mixture as you mix, yielding an even texture and juicy sausages.
- Choosing and Preparing Casings
Typically, hog or sheep casings are recommended for natural sausages. Rinse the casings thoroughly; soak in warm water as you flush out the residual salt for them to be flexible and clean. Another option is collagen casings, which offer a ready-to-use alternative.
- Stuffing the Sausages
Attach the sausage stuffer or stuffing attachment to the grinder. Slide the prepared casing onto the stuffing nozzle and fill it with the meat mixture, keeping a steady pace to avoid air pockets, resulting in a firm, evenly filled sausage.
- Linking and Storing
After filling, twist your sausages into links of any size you wish, firmly sealing each end. They can be cared for in the refrigerator for about three days or frozen beyond that duration to keep fresh and fit to eat.
Ground Beef for Burgers: Tips and Tricks
- Choosing the Right Meat-to-Fat Ratio
Fat content holds major importance in making all juicy and flavorful burgers. For such unforgettable moisture and taste, one must go for ground beef with an 80/20 proportion (80% lean meat and 20% fat). Any leaner choice will only dry out the patties.
- Handling the Meat Carefully
In shaping your patties, do not work the ground beef with your hands more than necessary. Overworking the meat will produce dense burgers with a somewhat tougher texture. Handle the beef lightly from shaping to cooking, so the patty remains tender.
- Uniform Patty Thickness
Make your patties with an even thickness, since it ensures the equal cooking of each part. About ¾-inch thick would be just great for an even cook and juicy center.
- Adding a Dimple for Evenness
Press a dimple in the center of the patty with your thumb before cooking. The dimple presses through any puffing up that occurs during grilling or pan-searing, resulting in a flat burger that is perfectly evenly cooked.
- Seasoning Strategically
Season the patties just before cooking. Indeed, salt draws moisture from the meat; hence, seasoning early would result in dry burgers. A fine way to flavor your burgers is to use very simple seasoning, such as salt and freshly ground black pepper, to bring out the beef flavor.
- Cooking Temperatures and Doneness
Using the broth thermometer, check temperature accurately. Ground beef is to be cooked according to the USDA standards to a temperature of 160°F(71°C) for safety, but that can be altered in accordance with your preference for doneness.
- Resting the Patty Before Serving
Allow the burger to rest for a few minutes once cooked; this redistributes the juices inside and prevents a lot of juice from escaping when one actually sinks down to the burger.
Maintenance and Care for Your Grinder Attachment
- Disassemble the Grinder
Give the grinder attachment a thorough disassembly to separate all removable parts such as the blade, plate, feed tube, and auger.
- Wash Components
Wash all parts with warm water and some detergent. Use a small brush to thoroughly clean all the difficult-to-reach areas. Do not immerse any part labeled that it is not washable or hand clean only.
- Dry Completely
Once washed, dry all parts immediately and thoroughly. At the very least, focus on immediate drying for anything prone to rust or corrosion, like the blade and plate.
- Lubricate Moving Parts
Rub in a small amount of food-grade mineral oil onto the blade and plate from time to time to keep the equipment working properly and avoid rust during storage.
- Reassemble and Store
Storage Solutions to Maximize Lifespan
Correct storage will help to sustain your equipment over time and maintain its functionality. Start with storage in low-humidity environments, to minimize corrosion, in particular, those constructed from metals that are prone to rust, Stainless steel or carbon steel, etc. Incorporating silica gel packets or any other desiccant into storage containers is an effective way to control moisture levels. Further, ensure all items have been cleaned and dried well to prevent bacterial contact and material degradation.
Use protective covers or sheathes for fragile components or sharp-edged tools like blades to thwart physical damage and secure user safety during handling. Storage systems such as compartmented bins and racks mounted on the wall will alleviate unnecessary wear by inhibiting items from being tossed about or misplaced. Wherever appropriate, abide by the cited storage instructions including temperature ranges and suggested storage positions from manufacturers to promote their performance in the long run.
Best Practices for Maintaining Your Metal Food Grinder
To keep your metal food-grinder in top condition, dry after usage, cleaning is necessary. Undue start to disassemble the grinder as per the manual instructions, with all components being safely detached. Wash every part in warm, soapy water using a soft brush to take off any food debris in grinding plates, blades, and screw auger. When parts can be washed by a dishwasher, check the product manual for instructions on using your dishwasher.
Reference Sources
-
Metal Food Grinder Attachment – KitchenAid
This page highlights the Metal Food Grinder Attachment (KSMMGA) designed for KitchenAid stand mixers. It emphasizes its compatibility with all KitchenAid mixers and its versatility in grinding various types of meat. The attachment includes five tools for different grinding needs and features a larger tray for processing larger batches efficiently. -
Metal Food Grinder Attachments on Amazon
This Amazon listing describes a premium aluminum alloy meat grinder attachment compatible with KitchenAid mixers. It focuses on the attachment’s durability, performance, and ease of use. Customers appreciate its ability to grind lean meats and its straightforward installation and cleaning process. -
Food Grinder Attachment – KitchenAid
This page details the KSMFGA Food Grinder Attachment, which connects to the power hub of KitchenAid stand mixers. It uses the mixer’s power to process fresh ingredients quickly and efficiently, making it ideal for grinding meats and preparing homemade recipes.
Frequently Asked Questions (FAQs)
Q: What is a meat grinder attachment for KitchenAid mixers?
A: A meat grinder attachment for KitchenAid mixers is a versatile accessory that allows you to grind various meats at home. This attachment connects to the power hub of your KitchenAid® stand mixers, ensuring efficient grinding. The metal food grinder attachment is designed to handle heavy-duty grinding tasks, making it ideal for those who want to prepare their own ground meat or sausage stuffing. With this attachment, you can also use different grinding plates for coarse or fine grinding, depending on your recipe needs. It’s a great way to control the quality and freshness of your ingredients.
Q: How do I use the grinder attachment for KitchenAid stand mixer?
A: Using the grinder attachment for KitchenAid stand mixers is straightforward. First, ensure that all parts are clean and assembled correctly, including the grinding plate and food tray. Pre-chill the grinder components in the freezer for optimal performance, especially when grinding fatty meats. Feed the meat into the attachment slowly, using the included pusher to guide it through the grinding plate. You can also use the attachment for other food processing tasks, such as making even fresh bread crumbs or grating hard cheeses. Always refer to the user manual for specific instructions and tips for your model.
Q: Can I use the meat grinder attachment for grinding vegetables?
A: Yes, the mixer meat grinder attachment can be used for grinding vegetables, although it’s primarily designed for meat. You can use it to create purees, sauces, or finely chopped vegetables for various recipes. Just be cautious, as certain veggies may require a different approach compared to meat. For instance, softer vegetables might clog the grinder, so it’s advisable to cut them into smaller pieces before grinding. This attachment is versatile and can definitely enhance your food preparation capabilities, especially when combined with other kitchen aid attachments like the slicer shredder attachment for KitchenAid.
Q: What types of meats can be ground with a dedicated meat grinder?
A: A dedicated meat grinder, such as the meat grinder attachment for KitchenAid, can handle various types of meat, including beef, pork, and poultry. You can also grind tougher cuts of meat, as long as they are cut into manageable pieces. For best results, it’s recommended to pre-chill the meat before grinding to maintain texture and flavor. Additionally, the grinder attachment can be used for making custom blends, allowing you to mix different meats for unique flavors. This versatility is a significant advantage for home cooks looking to experiment with their recipes.
Q: Are the parts of the food grinder attachment dishwasher safe?
A: Many parts of the food grinder attachment, such as the metal components, are dishwasher safe, making cleanup convenient. However, it’s essential to check the specific instructions that come with your grinder attachment for KitchenAid to ensure you are following the manufacturer’s recommendations. Hand washing is often advised for the grinding plates and any plastic components to maintain their longevity. Proper care will help you get the most out of your mixer attachments, ensuring they remain in good condition for all your meat grinding and food processing needs.


