
If you are looking to add precision and functionality to your KitchenAid stand mixer attachment lineup, you will want to miss the Metal Meat Grinder Attachment. It is not actually an attachment; it is more of an upgrade, perfect for aspiring culinary artists who want to work from scratch, valuing fresh, high-grade ingredients and total autonomy in their culinary pursuits. This comprehensive guide will answer all your questions about the KitchenAid Metal Meat Grinder. From its sturdy build and excellent performance to its numerous uses, discover how this attachment can truly make your life easier in the kitchen. For all your meat grinding, sausage making, or any other more creative kitchen tasks, this guide should provide you with all the know-how needed to make the best use of this indispensable appliance.
Overview of the KitchenAid Metal Food Grinder Attachment
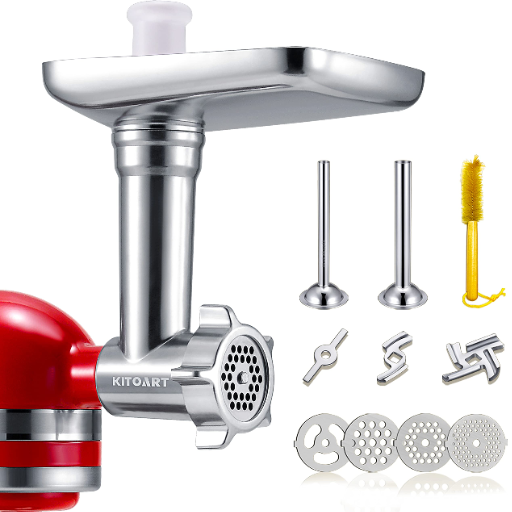
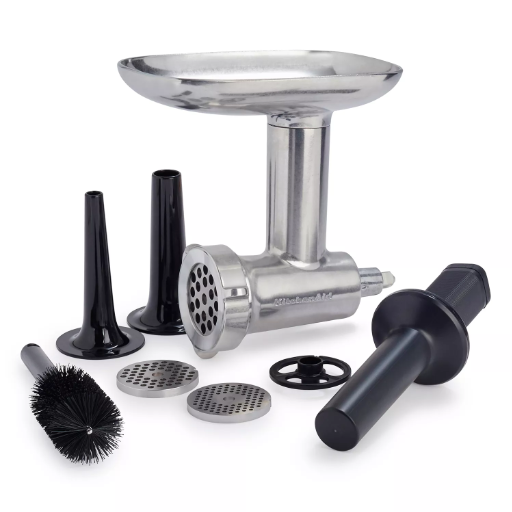
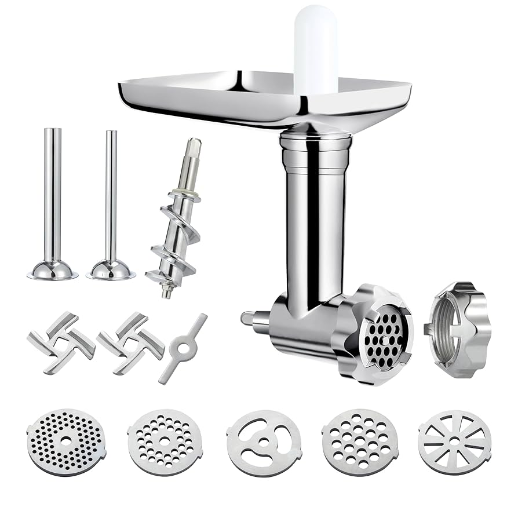
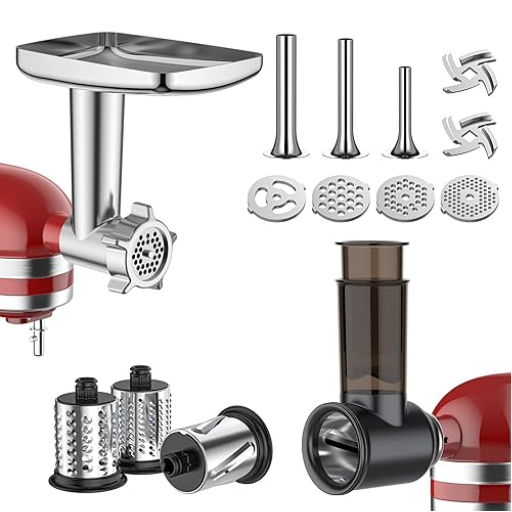
The KitchenAid Metal Food Grinder Attachment is a sturdy and versatile tool that, on the one hand, enhances your culinary skills. Made out of metal-grade material, it promises longevity and truly works well in grinding meats, cheeses, bread crumbs, etc. It comes with fine, medium, and coarse grinding plates, and a sausage stuffer to keep it functional. Attachable to any KitchenAid stand mixer, it works like a charm. When it comes to easy assembly and cleanup, this compact grinder is a significant time-saver for both amateurs and professionals.
What is the KitchenAid Metal Food Grinder Attachment?
The KitchenAid Metal Food Grinder Attachment is a sturdy and versatile tool designed to make KitchenAid stands mixers more functional. Made of quality metals, it is manufactured to withstand a large number of food preparation tasks ranging from grinding of meats, grating hard cheese to making custom blends of ingredients with great precision. It is equipped with interchangeable grinding plates: fine, medium, and coarse to suit different textures and recipes. More so, it also serves as a sausage stuffer for users to make homemade sausages with ease. Its simple assembly and user-friendly design guarantee quick usage and cleaning. Designed for the home cook and the culinary professional, the KitchenAid Metal Food Grinder Attachment is a trusted option for anyone wishing to expand the dimensions of their working kitchen.
Key Features of the KSMMGA Model
- Durable Metal Construction
Made of metal, the KSMMGA model promises to be a model of durability and performance when subjected to heavy or intensive use. Resistance to wear and tear is another strong suit of this robustly built product, making it an item that can be used on a frequent basis in demanding kitchen environments.
- Three Grinding Plates
The attachment provides three stainless steel grinding plates for various grinding requirements: fine- 3mm, medium- 4.5mm, and coarse- 8mm. Those plates help the user acquire the specific texture needed for several recipes, from very smooth pâtés to coarse-ground meats.
- Sausage Stuffer Kit
The KSMMGA comes with two sausage-stuffer tubes (9.5 mm for thin sausages and 19 mm for thick sausages) together with the stuffing spacer, making the stuffing of sausages at home quick and simple, from making classic bratwurst to spicy chorizo.
- All-Metal Food Tray
The food tray has a large capacity, holding plenty of ingredients and requiring little topping up so that the performance of the task in hand can be kept steady.
- Compatible with All KitchenAid Stand Mixers
Designed for the utmost practicality, the KSMMGA metal grinder attaches quickly and easily to almost any KitchenAid stand mixer and operates by drawing power from the power hub established on the mixer.
- Easy Assembly and Cleaning
The attachment is easy to put together with labeled parts for intuitive setup. Disassembly for cleaning is also very quick, and many parts like the grinding plates and blades are dishwasher safe on top of being hand-washable.
Compatibility with KitchenAid Stand Mixers
Benefits of Using the KitchenAid Meat Grinder Attachment
- Enhanced Freshness and Control: Grinding meats gives you a lot of control on how good, fresh, and textured your ingredients are; this, consequently, makes for a much better result in your recipes.
- Versatility: This attachment is not just for meats; it will also work through vegetables, breadcrumbs, or hard cheeses, allowing flexibility in diverse culinary activities.
- Cost-Effectiveness: Often whole cuts of meat purchased for grinding at home cost less than the compared ground meat, if not a bit; this way, let alone irrespective of said additives.
- Easy to Use and Clean: The attachment is made to easily attach onto KitchenAid stand mixers, thus going through a rather simple assembly process before using and an easy cleaning afterwards. This makes it very suitable for regular use.
- Customizable Grinding Options: With different grinding plates included, users can achieve their desired level of coarseness or fineness, tailored to their specific recipes.
Advantages Over Traditional Meat Grinders
- Versatility and Compatibility: A kitchen appliance like a meat grinder can never be generic, and one that will be built to match the KitchenAid stand mixer will never need to be considered as an additional appliance. Saving counter space is its appeal.
- Enhanced Durability: Built from raw high-quality materials, namely stainless steel and food-grade plastic, the attachment is meant to go heavy-duty without ever having to compromise performance. These sturdy materials guarantee a lifetime more than many of the traditional grinders, thus negating the need of buying one again.
- Optimized Efficiency: Assisted by the motor power of the stand mixer, the attachment continues to perform with steady and consistent throughput, processing up to 3-4 pounds of meat per minute depending on the model of mixer; in many cases, this also greatly surpasses the throughput of manual and many electric standalone grinders.
- Customizable Output Control: These multiple grinders plates give you finer control over texture; they range from coarse grinding for making sausage to fine grinding for pâté. Usually, traditional grinders do not have this great scope of control.
- Improved Hygiene and Maintenance: The attachment removes easily and thus allows even the smallest parts to be cleaned very well, hence ensuring safety and cleanliness of food materials. Most traditional grinders need a very tiring disassembling process and cleaning, thus are less favored for frequent use.
Versatility in Grinding Different Types of Meat
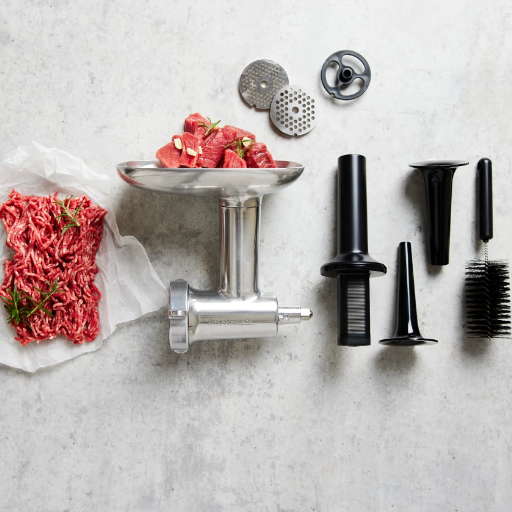
The KitchenAid meat grinder attachment is designed to prepare practically any variety of meat efficiently and with precision. From grinding beef, pork, poultry, lamb, and even fish superconsistently into certain textures and grades, it allows home cooks and chefs to extend their culinary repertoire to include gourmet sausage, fresh barrier, and seafood blends. Furthermore, by grinding tougher cuts of meat, the device reduces wastage and increases yield; this excellent construction allows it to be used with lean and fatty cuts with a sufficient level of performance.
Cost-Effectiveness and Efficiency
As the demand for precision and resource optimization grows within the culinary world, modern meat grinders integrate high technology to ensure extreme cost-effectiveness and give faster performances. These grinders work through enormous amounts of meat during just one single operation, thus, preparing food quickly and streamlining workflow for both small-scale and large commercial kitchens. Conversely, it entertains a variety of contexts in grinding various types of proteins, including tough cuts, ensuring that wastage is minimal by making sure that the highest output is achieved from each portion they work. Studies in the food processing industry show that high-performance grinders decrease food wastage by 10 to 15%, as compared with the manual processes in an old-school style. That is a substantial saving for any business. Aside from that, the intelligent design of the grinders empowers energy efficiency with low maintenance needs so as to assist in reducing the working cost with the passage of time, which undoubtedly makes the grinder an investment that is both financially and practically worth carrying for culinary professionals alike.
Practical Tips for Using the KitchenAid Food Grinder Attachment
- Prepare Ingredients Properly
Cut meat, vegetables, or whatever raw ingredients are to be ground into smaller pieces so that it becomes easy to feed into the grinder. The result will be smooth grinding with consistent working.
- Chill Ingredients and Attachment
Freeze the ingredients and the grinder for 15-30 minutes before grinding to avoid clogging while improving efficiency.
- Use the Correct Plate
Fit the grinder with the plate required according to the texture to be obtained. Fake plate is suitable for meat or chunky mixtures, whereas fine plate results are fine for smooth or delicate ones.
- Feed at a Steady Pace
Use the food pusher provided to feed the recipe into the grinder. Do not fill it up too fast or push the food through; this will force the motor too much.
- Clean Thoroughly After Use
Preparing Meat for Grinding
In all the steps of preparation, grinding should be the last operation to ensure the texture, consistency, and safety of the product. Selecting good-quality meat cuts is essential, with a good fat-to-lean ratio: usually about 80% lean meat and 20% for the most flavor and moistness. Excessive amounts of connective tissue, sinew, or gristle should be trimmed away as they clog the grinder or produce uneven grinding.
Chill the meat and the grinder parts, such as the blade and plates, for at least 30 minutes in the refrigerator or freezer before grinding. This reduces smearing and helps in holding the structure of meat fibers with grinding. Cut the meat into uniform sizes, about 1-1.5 inches cubes, so that feeding through the grinder will be consistent. Implementation of these preparation methods will make your grinding process more efficient and give a better product to the customers.
Optimal Grinding Techniques
When trying to enhance the grinding procedure, it is important to keep the elements involved as precise as possible to lead to uniform results. Start with choosing the grinding plate size to be used, depending on texture. Coarse plates are used for stuff like sausage and chili, while fine plates are perfect for pâtés or meatloaf. Ensure blades in the grinder are sharp, as dull ones will crush rather than cut resulting in an undesired texture and increased wear on the equipment.
To increase efficiency, feeding the grinder should be done at an even pace to avoid jamming. It is best to grind the product twice to increase fineness, from coarse to fine. One should also keep an eye on the working temperature; if the grinder is overheating or simmering due to long use, it can compromise the quality of the meat and food safety. One should be wise to invest in a grinder with a reverse function to safely resolve issues with clogging without dismantling the grinder.
Maintenance and Cleaning of the Metal Food Grinder Attachment
Keeping the metal food grinder attachment well-maintained and clean will guarantee that it lasts for years and that it remains safe for food preparation. The method of cleaning and maintenance includes:
- Disassembly: Very carefully disassemble all removable parts of the grinder, including the grinding blade, plate, auger, and food tray.
- Pre-Cleaning: Rinse all of the parts under warm running water immediately after use with the intention to remove all food particles.
- Washing: Use warm, soapy water and a soft brush to thoroughly clean each component. Avoid abrasive materials that could damage the metal surface.
- Drying: Parts should be dried completely before assembling. One can use a clean towel, or alternatively, air dry it so that moisture is not trapped. That would promote rust induction or contamination.
- Lubrication (Optional): Lightly coat the grinding blade and plate with mineral oil that is safe for food if stored for a long time.
- Storage: Store all components in a dry place, ideally in their original packaging or a protective container, to avoid exposure to moisture or debris.
In the interest of achieving maximum efficiency, one should constantly inspect for wear and tear, such as dull blades or warped parts, and replace from time to time with any component that the situation so demands. Care must always be taken to read through the manufacturer’s instructions to ascertain proper maintenance.
Step-by-Step Cleaning Instructions
- Disassemble the Equipment
Start disassembling the parts of the machine by hand. The complete instructions for removing the parts without damaging the equipment should be detailed in the product manual.
- Pre-Rinse Components
Rinse each part with water that is warm. Taking this step alone can remove loose debris and particles so that no food particles remain.
- Apply Cleaning Solution
Use a food-approved detergent or cleaning solution suitable for your type of equipment. Prepare a solution of warm water and detergent and clean every single component with a soft-non abrasive brush so as not to scratch the surface.
- Sanitize Components
Once cleaned, sanitize all parts by soaking them in a solution containing at least 50–100 ppm of chlorine bleach or an equivalent sanitizer for at least one minute. Ensure you follow safety guidelines for proper dilution rates and rinsing protocols.
- Dry Thoroughly
Once you have rinsed all parts, wash off the sanitizing and cleaning solutions with water. Then, dry each part either by wiping with a clean lint-free cloth or place them in a clean area to air dry. Any type of damp surface could promote microbial growth or contribute to rusting.
- Inspect for Residue or Damage
Inspect all parts for residue or a stain remaining on them. If the residue is still there, then cleaning should be repeated. Parts that have visual impairments, such as cracks or sharp edges, have to be replaced immediately.
- Reassemble and Store
Extending the Lifespan of Your Meat Grinder Attachment
Ensuring a thorough cleaning after each use extremely prolongs the life of a meat grinder attachment. Start out by following the motion of disassembly for the attachment given by the manufacturer, concurrently keeping in mind smaller parts such as blades and plates that tend to catch residues. Use warm, soapy hand-washing water for each piece while avoiding abrasive cleaners and sponges that will eventually eat off the finish or surface of the materials within. Stainless steel components ought to be air-dried or dried immediately with a towel to prevent rust or corrosion. Washing with such thoroughness prevents degradation of the materials and cross-contamination between processing sessions.
Comparing KitchenAid’s Meat Grinder Attachment with Other Brands
- Performance and Versatility
KitchenAid meat grinder attachments are quite versatile when it comes to grinding meats and vegetables or even grinding cheeses into powder down to exact specification based on the product you intend to work on. In comparison with several other brands, KitchenAid attachments can be plugged right into its mixer with a high degree of ease so that using it does not warrant you having another appliance at all. Of course, Cashmere aims at making a more powerful motor with inherent power settings, whereas KitchenAid focuses on adaptability and multi-functionality, the sweet spot for day-to-day jobs.
- Build Quality and Durability
Depending on the product type being discussed, KitchenAid grinder attachments are usually metal or hard plastic, giving easy long-term use and maintenance. About competitors’ brands, some of which manufactures less sturdy materials or sometimes without half the number of components that KitchenAid executives supply. The industry still recognizes KitchenAid attachments for their reliability and brilliant design. Look into regular cleaning and proper storage to gain a few more years from them as in the user manual.
- Ease of Use
KitchenAid has a big plus for usability just because it squeezes so well into existing mixer systems. Both the setup and procedures are so easy that the first timer can handle it without any help. Many standalone choices have a few steps for assembly and are just as bulky for storage.
- Cost Efficiency
Feature Comparison with Competitor Products
|
Feature |
KitchenAid Attachment |
Generic Competitor Attachments |
|---|---|---|
|
Build Material |
High-grade stainless steel |
Plastic or low-grade materials |
|
Durability |
Long-lasting with consistent use |
Susceptible to wear and breakage |
|
Precision |
High accuracy for performance |
Limited precision in functionality |
|
Versatility |
Supports multiple attachments |
Limited compatibility and options |
|
Ease of Cleaning |
Dishwasher-safe design |
May require manual cleaning |
|
Price |
Mid to high price range |
Generally low upfront cost |
|
Warranty |
1-5 years depending on model |
Short or no warranty coverage |
|
Customer Support |
Comprehensive and reliable |
Varied, often limited |
|
Noise Levels |
Quiet operation |
May produce significant noise |
|
Availability of Spare Parts |
Widely available |
Limited or hard to find |
Price Point Analysis of Different Attachments
Whether products being sold at an attachment price range are worth the price is an option to ponder. Typically, good quality attachments fall right in the medium to high price range due to the premium materials and complicated engineering considered in their manufacture. These avenues provide better durability, higher performance, and longer warranty periods to pay off for the upfront investment.
On the other hand, the less expensive ones are, by all means, more wallet-friendly yet do not possess the qualities of resistance and functionality. These could be more often replaced or repaired, thus, in effect, making the cumulative cost higher in the long run. Limited availability of spare parts and shortened warranty periods often accompany low selling prices, which, in a way, can create problems with long-term reliability.
Consider that price differences in most cases actually reflect specific features oriented toward quite different user-case scenarios, such as noise levels, ease of cleaning, or compatibility with multiple devices. Consumers should weigh up their individual requirements against their use patterns to choose an option most cost-effective in their circumstances.
User Feedback and Reviews
Reference Sources
-
- Overview: This attachment connects to any KitchenAid Stand Mixer and is designed for grinding meats, hard cheeses, and bread crumbs. It includes fine, medium, and coarse grinding plates, as well as sausage stuffer tubes.
-
- Highlights: The grinder is praised for its versatility, allowing users to create fresh, inventive foods. It includes multiple grinding plates and sausage stuffer tubes, making it suitable for various recipes.
-
- Customer Feedback: Users appreciate its ease of use, efficient grinding, and the ability to handle small batches. However, opinions on material quality vary, with some preferring stainless steel over aluminum.
Frequently Asked Questions (FAQs)
Q: What is the KitchenAid stand mixer meat grinder attachment?
A: The KitchenAid stand mixer meat grinder attachment is a versatile tool that allows you to grind meat at home using your KitchenAid® stand mixer. This attachment makes it easy to create your own ground meat for burgers, meatballs, and more, ensuring you know exactly what goes into your meals. It’s designed to be compatible with KitchenAid stand mixers, transforming them into powerful meat grinders. With this attachment, you can also experiment with making your own sausages, as it typically includes sausage stuffer tubes for added convenience.
Q: How do I maintain a cold grinding temperature with the metal food grinder attachment?
A: To maintain a cold grinding temperature while using the metal food grinder attachment, it’s essential to pre-chill the grinder components, including the stainless steel food grinder and the mixer bowl. This helps prevent the fat in the meat from smearing, ensuring a finer grind and better texture. Additionally, you should work in smaller batches and keep the meat chilled until you are ready to grind. If you can, place the meat in the freezer for about 30 minutes before grinding to achieve optimal results.
Q: Can I use the food grinder attachment for other food items?
A: Yes, the food grinder attachment for KitchenAid can be used for a variety of food items beyond just meat. You can grind vegetables, such as tomatoes and peppers, or even make breadcrumbs from stale bread. This versatility makes the KitchenAid metal food grinder attachment a valuable addition to your kitchen. Just make sure to clean it thoroughly after each use to prevent cross-contamination of flavors. It’s a great tool for food prep time, allowing you to be creative in the kitchen.
Q: What are the benefits of the stainless steel meat grinder attachment?
A: The stainless steel meat grinder attachment is designed for durability and easy cleaning. Unlike plastic attachments, stainless steel is less likely to absorb odors and stains, making it the perfect mixer attachment for KitchenAid. This material also provides a more effective grinding process due to its robust construction. Additionally, stainless steel is more resistant to wear and tear, ensuring that your attachment will last for many years of use. Overall, it enhances the power of the mixer and allows for consistent grinding quality.
Q: Which KitchenAid models are compatible with the KSM-MGA metal food grinder attachment?
A: The KSM-MGA metal food grinder attachment is compatible with most KitchenAid stand mixers, including popular models like the KitchenAid Artisan and Professional series. If you own a KitchenAid mixer, you can easily attach the grinder to the power hub, transforming it into a meat mincer. It’s important to check the specifications of your specific model to ensure compatibility. This versatility makes it a fantastic investment for anyone who enjoys cooking and wants to expand their culinary skills.


