
Among the many products in the line, which are known for their high quality and universality, a special place is taken by the meat grinder attachment for the KitchenAid. The extent is such that the mounted appliance in question can do work and grind meat among other things, as well as assist in making sausages or even turn vegetables in soup into shredded tree branches, and so on. Whether the most novice of chefs, a basic home cook aspiring to upgrade their food preparation skills, or a health-conscious foodie in pursuit of controlling everything that goes into their body, the meat grinder attachment will present them with fresher and more adjustable culinary possibilities. In this article, we will explore every detail of the KitchenAid meat grinder attachment, including what it actually does and how you can use and get the most out of it. So, go ahead and explore the new ways to utilize this rate item in kitchen tools.
Benefits of Using a Meat Grinder Attachment
- Freshness and Quality Control
Grinding your own meat ensures optimal freshness and allows you to control the quality of the ingredients, avoiding preservatives, fillers, or additives often found in pre-packaged options.
- Versatility in Recipes
Making meat in a meat grinder gives an opportunity to play with many dishes such as burgers and sausages, meatballs and pates, allowing the cook to customize different flavors and textures.
- Cost Efficiency
Purchasing whole cuts of meat and grinding them yourself can be more economical than buying pre-ground meat, especially when buying in bulk.
- Improved Texture and Flavor
Basically, pre-ground meat usually tastes better and can be adjusted to the desired fineness, which will have a better effect on your meals.
- Dietary Customization
For instance, when it comes to catering for those friends with special dietary health requests, such as low-fat or allergies, the meat grinder helps to create food for even these people with precision. This is because one can prepare food items in whatever manner as per their wishes, etc.
Time-Saving Advantages
- Batch Processing Efficiency
A meat grinder provides a lot of ground meat in a short time. It is ideal to those of us who have families with members who like proper meals and/or willingly prepare meals in advance.
- Reduction of Shopping Trips
Working with the theory of purchasing huge chunks of beef and grinding them every few weeks is consistent with reducing the frequency of grocery visits. This kind of working habit integrates and saves you time as there is readily ground meat whenever you want it.
- Multifunctional Usage
Nowadays, most of the meat grinders are constructed in such a way that they have multiple attachments that are used in grinding meat, making sausages, grinding vegetables and even making bread. Such adaptability reduces the reliance on other kitchen appliances during meal prep, thereby saving time on chores.
Freshness and Quality of Ingredients
- Enhanced Control Over Freshness
Electing to grind meat at home guarantees that the raw material is always fresh, which cannot be said for essentially any other technique. Since consumers often cook food right after purchasing meat in whole form, while it contains all its nutrients, the nutritional value of the ground meat stays high and does not risk getting destroyed in a long shelf life of the food. Ground meat is also termed as fresh meat ground on the same day of use because it is the only meat used, rather than being facilitated by other gases, all at the consumer’s home.
- Reduced Additives and Preservatives
A lot of the times, ground meat that comes from the grocery stores is filled with preservatives or synthetic additives to keep it fresh or just to make the meat look more presentable. When one is binging on self-ground meat, there is virtually nil presence or use of such food-enhancing substances so that the food experience is more natural. Such honesty in the choice of ingredients addresses nutritional specifics as well as eliminates unwholesome ingredients.
- Retention of Nutrient Integrity
Research reveals that fresh meat, which has been ground, has a better quality in terms of nutrients, including protein and iron, than the pre-ground one bought from the supermarket. The processing is controlled so as not to lose these nutrients due to time, oxidation and external factors, which is perfect especially for those who care about nutrition the most.
Customization of Meat Blends
Minced meat customization is beneficial to both the demanding customers imposing on this market and provides easier dietary control. Both professionals in the catering industry and home cooks can even adjust the flavor or texture content of the dish simply by altering the proportion of fat to non-fatty forms. For instance, there are some preparations that may benefit from the fat, such as making hamburgers excessively greasy, as others might work better with a healthier version of the beef patty, which is made with little extra fat.
In addition to this, it is more comfortable to use other types of meats like mixing beef and veal or pork to come up with unique combinations of tastes which will also increase the number of options that a client has. When preparing meat in such a manner, it also introduces the use of alternative protein sources including vegetarian or vegan products, as well as rare breeds of animals. These meat lattices not only increase gastronomic satisfaction but, more importantly, are balanced with calorie targets. Proper use thereof at home or in a restaurant is a purchasing point.
Step-by-Step Instructions for Set-up and Use
- Prepare the Equipment
Sanitize all tools, utensils and machinery used in processing the meat mixture and ensure that they are in working condition. This means having the grinders, mixers and cutting boards clean.
- Select Ingredients
Select the best ingredients for the design of the meat blend, considering it must be fresh and with a certain fat-to-protein proportion. These other ingredients may include spice mixtures or sprinkle agents among others.
- Measure and Portion
Accurately weigh and divide the ingredients to reduce any variation in their texture and taste. Make sure to have a digital that has exact measuring capability for this work.
- Mix Thoroughly
Put all listed products into a meat mixer or knead by hand until the mass reaches a uniform consistency. Avoid excessive handling, as it may lead to loss of characteristics of the final product.
- Shape or Process
Do not hesitate to shape meat mixtures into desired shapes using devices like molds, cutters, or extrusion facilities like the patties, and sausages and the rest can be shaped in a special way.
- Cook or Store
Run the meat blend through cooking, freezing or vacuum packaging depending on what is required of it. Follow the recommendations for proper food handling in order to ensure quality preservation of each provision and prevent transmission of microbial contaminations.
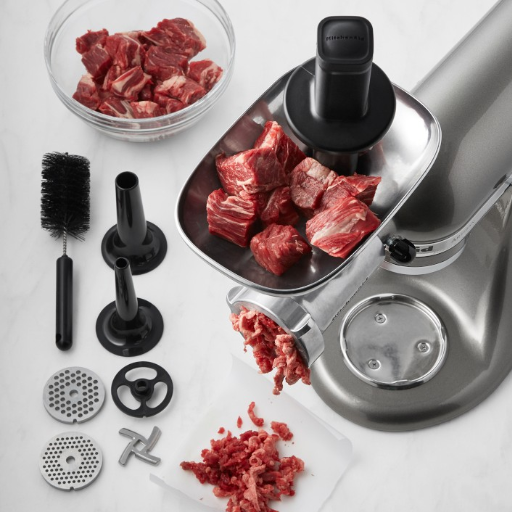
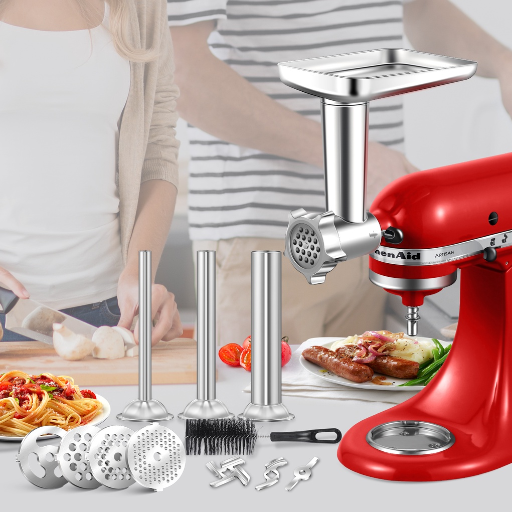
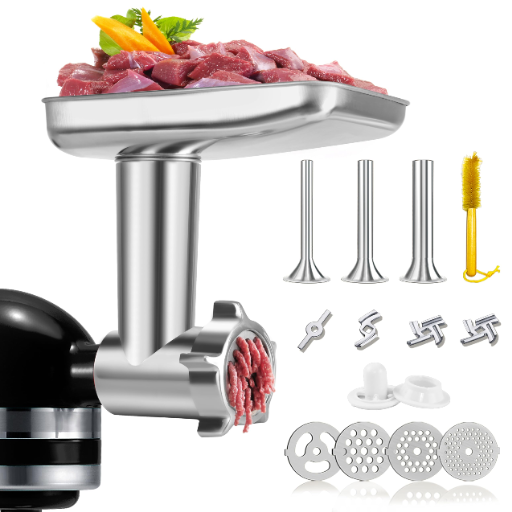
How to Attach the Grinder to Your KitchenAid Mixer
- Prepare the Mixer
Switch off the mixer and remove the cord from the power supply. Loosen the hub knob at the front of the mixer so as to remove any existing attachment from the power hub.
- Install the Grinder Assembly
Connect the power hub’s grinding attachment to the appliance by sliding it towards the attachment area and making sure its cutting slot is aligned with the component. Fit the grinding piece firmly in its place by pushing it through the attachment. After that, turn the hub knob to the right side only just until the appropriate tightness so that the slot does not change even during the operation.
- Attach the Grinder Components
Assemble the remaining parts of the mincer, namely the spiral, knife, chopping disc, and nut. Insert the screw in the body and check that the blade is facing outward and that the edge is very sharp. Choose the appropriate chopping disc and attach it to the screw, and then install it using the nut by turning it to the right until it stops turning.
- Confirm Proper Assembly
Troubleshooting Tips for First-Time Users
- Grinder Does Not Turn On
- Potential Cause: The mixer is not in a correct position or the accessories are not attached.
- Solution: See that the power line is socketed and the attachement hub is also in right position securely. Check whether the mixer speed is adjusted as necessary.
- Technical Note: The mixer needs at least 120V electricity to function as required. Using long extension cords which are more than 6ft in length can cause a reduction in voltage and problems.
- Meat or Food Gets Jammed in the Grinder
- Potential Cause: Some of the parts should be flexible while other parts should be rigid
- Solution: When tough main stocks are utilized, cut sizes to approximately one inch and allow them to partly thaw before meat grinding commences. For tougher cuts, think about cooling the grinder attachment in the freezer for about 20-30 minutes.
- Data Insight: Studies had shown that chilling ingredients reduces the friction and increases the grinding speed by 30%.
- Uneven Grinding Texture
- Potential Cause: In the first place, there can be a problem mainly with the tooth or the plate not being well aligned.
- Solution: Therefore, the utensil should first be taken apart for the entire thorough cleaning then assembled again. There is an inaccuracy in connecting particular elements of the tool-the bite plate has to be placed stand up opposite the sharp side of the blade.
- Technical Tip: Hand-tighten the securing bolt in such a way that, it firmly fixes the plate and blade but does not hinder the utilization.
- Excessive Noise or Vibration
- Potential Cause: The devices or their parts are not securely tightened or incorrect settings in revs.
- Solution: To be able to counter the problem, stop the mixer from working and check if there are any parts or screws that are shaky. When grinding with the mixer, lower revolutions should be applied, anything less than speed No. 4.
- Reminder: Operating at high speeds will result in overheating and will diminish the life span of the internal elements of the machine.
- Grinder Fails to Process Ingredients Efficiently
- Potential Cause: Dull blade or improper cleaning.
- Solution: Check the sharpness of the grinder blade and replace if the blades appear blunt. Clean all internal surfaces thoroughly to remove any residue that may obstruct operation.
- Maintenance Tip: Always make sure to perform cleaning operations after every use, and always make sure your equipment is dried properly for safety purposes and consistent performance.
Tips for Choosing the Right Attachment
- Identify Your Primary Needs
Analyze the types of tasks done most frequently, such as blending, chopping, or grinding, and select appropriate tool attachments.
- Check Compatibility
- Material and Durability
Make sure to avoid mechanisms made of cheap materials like plastic that cause you to change the attachment after a very few uses, whereas with stainless steel or BPA-free plastic inclusions, you are assured of more than enough time of use of the attachments.
- Ease of Cleaning
Also, go for the attachments that are indicated to be used with the dishwasher or those that can be easily taken off for washing so as to reduce installation time.
- Warranty and Support
Different Types of Meat Grinder Attachments
|
Attachment Type |
Key Features |
Uses |
Material/Compatibility |
Maintenance |
|---|---|---|---|---|
|
Sausage Stuffer |
Funnels meat into casings |
Homemade sausages |
BPA-free plastic or stainless steel |
Dishwasher-safe and easy to clean |
|
Pasta Maker |
Shapes dough into pasta forms |
Homemade pasta (spaghetti, linguine) |
Food-grade metal or plastic |
Quick disassembly for cleaning |
|
Burger Press |
Forms uniform burger patties |
Hamburger patty preparation |
Heavy-duty metal or durable plastic |
Wipe clean or dishwasher-safe |
|
Kubbe Maker |
Creates hollow meat tubes |
Kubbe and other stuffed appetizers |
Stainless steel or BPA-free plastic |
Easily detachable for cleaning |
|
Meat Slicer/Shredder |
Slices or shreds cooked meats |
Sandwiches, salads, or meal prep |
Stainless steel or high-quality plastic |
Hand-wash for optimal longevity |
|
Vegetable Slicer |
Slices or grates vegetables |
Meal preparation and garnishing |
Food-grade stainless steel or plastic |
Dishwasher-friendly components |
|
Grinder Plates |
Controls meat texture (fine to coarse) |
Ground meat for various culinary dishes |
High-carbon steel or stainless steel |
Regular maintenance reduces corrosion |
|
Nut Butter Grinder |
Grinds nuts into smooth butter |
Homemade peanut or almond butter |
Durable, non-corrosive materials |
Easy to rinse and clean |
|
Juicer Attachment |
Extracts juice from fruits/vegetables |
Fresh juices |
Durable food-safe materials |
Detachable parts for thorough cleaning |
|
Cookie Press |
Extrudes dough into cookie shapes |
Baking cookies with precision |
Stainless steel or durable plastic |
Disassembles easily for washing |
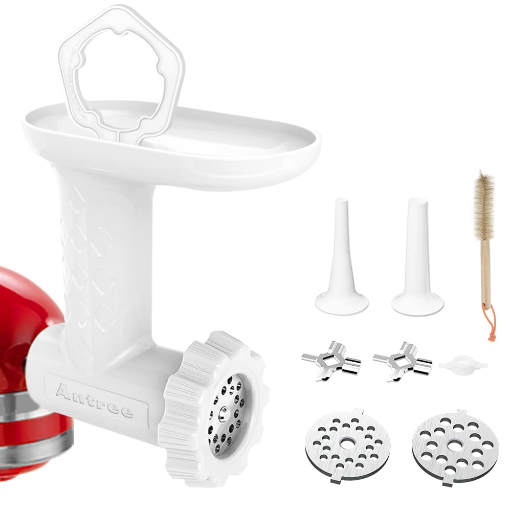
Compatibility with KitchenAid Stand Mixers
KitchenAid stand mixers are highly versatile. All of the attachments mentioned in the advantages are very compatible with the mixer’s power hub. The nut butter grinder, juicer attachment, and the cookie press can be attached directly to any model of the KitchenAid stand mixer by the power hub and by utilizing the power of the motor, and they will also yield precise and efficient results. These attachments fit the dough bowl in the mixers ranging from 4.5 to 7 quart models, likewise making this only effective with the most common KitchenAid mixers in smaller households. And there is no need for extra force or tools in order to keep up with these attachments due to their inherent calming capability, which yields the outcomes for which effective operation. With tilt-head and bowl-lift features, strain-relieving features are further enhanced in a stand mixer for specific recipes. This does not limit their use to the functions of cooking. It further adapts them for use in meals prepared in unique environments. Their durability and convenience anticipate how kitchen activities will be carried out.
Selecting the Best Option for Your Needs
Purchasing additional features for your KitchenAid stand mixer will be determined by the goal and the skills you want to achieve and the kitchen details available to you. Be it pasta rollers, food processors, or meat grinders, a special-purpose attachment is employed for specific cooking. If the goal is to prepare thin pasta sheets for pasta dishes at home, the perfect solution would be a pasta roller while a food processor bades on pulse moves to chop, slice or grate, to prepare ingredients for a meal.
It is also important to consider the size and weight of the particular Kitchenaid mixer. The best idea is to focus on how the materials, including either stainless steel or high-grade plastic materials, in the item have been made because it is what determines how long it will last and the ease of maintaining the appliance. Performance reviews and user ratings, as well as a comparison of product specifications, can be used to determine the efficacy of a particular attachment. Optimizing the performance of your stand mixer in the kitchen is a matter of choosing the right combination of culinary application and personal technology.
Cleaning and Maintenance Guides
- Detach Removable Parts: Disconnect power, and detach all removable parts such as mixer bowl, mixers, and other attachments before attempting to clean the unit. Follow the instructions in case of other accessories being present in the mixer design.
- Hand Wash or Dishwasher: Most attachments can be safely washed in a dishwasher, but always read the instruction manual to make sure that this applies. If hand washing is needed, fill the sink with hot soapy water and a gentle sponge and let the parts be cleaned gently.
- Wipe the Main Unit: Use a wet piece of cloth to clean the actual device of blenders. Don’t attempt to clean it by submerging it in water or allow things like water and the like inside the cracks or crevices. If it proves difficult, slightly wet a cloth and add a bit of dish soap then apply it to the surface and hands.
- Dry Thoroughly: Make sure everything is completely dry before you put it back together. Best to use a towel so that it does not block up or leave water blemishes which could result in rust or so.
- Preventive Maintenance: Keep the electrical cord of the mixer in check and do not tighten the attachment loose screws to ensure replacement parts do not wear out quickly.
1Adhering to these cleaning and maintenance practices will help extend the longevity of your stand mixer and ensure consistent performance.
Routine Cleaning Practices
It is obligatory to clean and maintain the sanitary conditions of your mixer to ensure continued use. Let the user start before taking out the plug to also cause safe cleaning process. Then after it is used, wipe the external parts with food soap. It helps to lessen splatters and residue from already-splattered food. And yet again, microfiber cloths are the best as grinding paste etc., can be removed from surfaces without scratching them. Both attachments and mixing bowls should be wiped with a warm solution of dishwashing liquid. It is advisable not to use rough sponges on the outside of the machine as the surface finish can be destroyed. Under such conditions, where persistent residues tarnish, wash the ingredients in a soapy solution before actual cleaning for about 10-15 blipping minutes. This will help in freeing such residues for easy removal.
Attention should be specifically given to openings and surface junctions on the body of the lot mixer since residues might collect over there. Utilization of a soft brush for cleaning or even an old toothbrush especially for areas in between, can help remove remaining food debris without any residual build-up. Thoroughly rinse all washed parts with clean water and then drain the parts entirely so as to prevent watermarks or oxidative damage. Doing the same after cleaning the food processes makes drying more efficient as opposed to trying to achieve sterilization through the cleaning process. All of the aforementioned steps are best observed after clean up in order to avoid damage and ensure safety as well as preventing any mold or corroding elements. Not only do these strategies help in protecting the look and operational efficiency of the mixer; they also aid in ensuring compliance with the requirements for handling food.
Storage Tips for Your Grinder Attachment
- Disassemble Before Storing
The grinder attachment must always be dismantled into its Street Fighter Collection components (i.e., the housing, blade, plate, and screw). Since it is useless to attach sharp edges, and even be damaged with water or corrosion, especially in the inner parts where cleaning is difficult.
- Clean and Dry Thoroughly
Before storing, make sure that each and every piece is clean and packed. Wet metal parts will attract rust or fungi which will result in the degradation of the internal functioning and hygiene of the attachment. Make sure that all moisture is removed using the microfiber cloth.
- Use Food-Grade Silicone Spray for Protection
Kitchen appliances should have a coating of food-grade silicone emulsion on their metallic elements such as blades and grinding surfaces to avoid getting rusty. This repellent will act as an extra coat of paint over the metal pieces and make them viable for their next use.
- Store in a Dry and Cool Environment
Choose a storage place which has no humidity and temperature changes. These can affect the components of the grinder or the material when drawers are closing or when the components are changing. Such places can be placed inside a cabinet which is away from the heat or the sun.
- Use a Storage Case or Bag
The grinder attachment should be stored in a pouch, tablet case, or any other designated case to keep the entire grinder setup together. This will prevent components from being lost and minimize dust and dirt exposure. Some manufacturers opt to come up with special cases – if so, in no standard provision, an airtight container should be selected.
- Avoid Overstacking or Heavy Weight
Stay away from dropping a higher weight over the meat grinder equipment or its jar. The excess may cause damage to the gadget conveniently, specifically to the grinding plates and blades.
Creative Recipes to Maximize Its Use
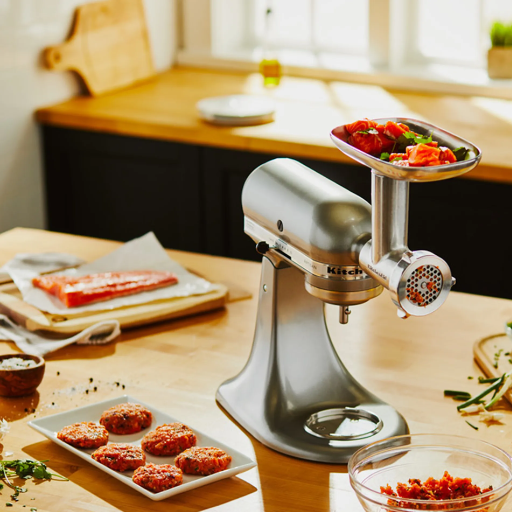
- Homemade Sausages
Another way to fix it is by creating some sausages from the mix of ground meat, spices, herbs, and binding ingredients. You can also use one of our meat grinders to prepare a chicken, a piece of beef, or a pig for a sausage.
- Fresh Burger Patties
Individuals can as well prepare hamburgers with a nice aroma by blending chunks of sirloin or chuck with toppings or even vegetables like onions, or garlic, or seasonings among others. This way of making burgers is better as it is tastier as comparison to the ready served burgers because of the taste which can be easily changed.
- Vegetarian Meat Alternatives
There are also options available that have no purpose of eating meat, such as making lentil burgers or vegetable patties as substitutes. In this case, adjust the grinder and crush them to get rid of hard pieces, and add chick peas, black beans, or mushrooms to the mixture.
- Nut Butter
Roast almonds, peanuts, or cashews and grind them to make your own nut butter that is very rich and creamy. If the mixture is too thick, add oil to reach the desired state.
- Fresh Breadcrumbs
There are still some uses for rancid bread; one of which is making finely crumbled bread crumbs in case the recipe is asking for the same. One is at liberty to cut the bread into tiny cubes and pass them through the grinder as long as they can hack the process with ease.
Homemade Sausages and Burgers
The advantage of making fresh sausages and burgers is that it offers comfort to most chefs in that they can determine the exact ingredients, flavors, and dietary needs of the consumer for a greater intake. Quality is a kitchen equipment that allows comfortable solving of the task of grinding the meat, coarser wherever possible, such as cutting beef, pig, or chicken in pieces. Spices, seasonings, and various herbs can be added directly to the processed meat, resulting in a total even taste dispersal of the ingredients. According to some of the youth today, and trends, gone are the days when burgers and different sausage preparations used meat such as beef that is grown in human terms; that is the case with such meats, mainly lentils or perhaps tofu. And they are less processed and healthier than the store-bought versions, which are loaded with additives and preservatives. For an edible dish, the fat content in the sandwich must be balanced with the meat. It is generally agreed that a fat content of around 20-30 % should be used in such a way as to make the meat juicy and good during the cooking, without the fear of fat flare up, during the cooking.
Meatballs and Other Ground Meat Dishes
Minced meat being so rich in color lends itself to a variety of culinary uses and it is safe to say that meatballs are the most popular way to enjoy its health benefits. It has been agreeably fed to a lot of people. It often comprises ground beef or a blend of ground beef and pork or ground beef and veal or even ground chicken, ground lamb or goat and other meats. A falafel, with its perfect round shape, is comprised of a mix of the minced meats, which are responsible for its composition, perhaps chicken or beef, alongside onions and eggs needed to make a firmer texture during stewing. Various herbs like garlic, onions as well as the mix of herbs can help to enhance the flavors in the meatloaf. The taste of modern cuisines takes care of the various needs by integrating the use of nontraditional protein foods such as plant protein in ground form to prevent malnutrition among non-meat consumers as well as to save the green planet.
Reference Sources
-
KitchenAid Metal Food Grinder Attachment – KSMMGA
This page highlights the versatility of the KitchenAid Metal Food Grinder Attachment. It allows users to grind meat, hard cheeses, and even make fresh bread crumbs. The attachment is designed to enhance the functionality of KitchenAid stand mixers. -
KitchenAid Metal Food Grinder Attachment on Amazon
The Amazon product page describes how the metal food grinder attaches to the power hub of any KitchenAid stand mixer. It emphasizes ease of use and the ability to let the mixer handle the grinding process, making it a convenient tool for home cooks. -
KitchenAid Metal Food Grinder Stand Mixer Attachment on Canadian Tire
This page explains how the attachment uses the power of the KitchenAid stand mixer to process ingredients efficiently. It also highlights its compatibility with various KitchenAid mixer models and its role in simplifying food preparation.
Frequently Asked Questions (FAQs)
Q: What is the best meat grinder attachment for KitchenAid stand mixers?
A: The best meat grinder attachment for KitchenAid stand mixers is often considered to be the metal food grinder attachment. This attachment is designed for durability and efficiency, allowing you to easily grind not only meat but also other ingredients like hard cheeses. With multiple grinding plates available, you can achieve both fine and coarse textures, making it versatile for various recipes. Additionally, it includes sausage stuffer tubes, enhancing its functionality for home sausage making. When selecting an attachment, ensure it is compatible with your specific KitchenAid model for optimal performance.
Q: Can I use a grinder attachment for KitchenAid mixer to grind vegetables?
A: Yes, a grinder attachment for KitchenAid mixer can be used to grind vegetables. This versatility allows you to create a variety of dishes, from veggie burgers to homemade sauces. The food grinder attachment is not limited to meat; it can handle soft vegetables and even some harder varieties, depending on the strength of your stand mixer. For coarse grinding, you can use the appropriate coarse grinding plates that come with the attachment. Just make sure to clean the attachment thoroughly after using it with different ingredients to avoid flavor contamination.
Q: How do I clean the metal food grinder attachment?
A: Cleaning the metal food grinder attachment is straightforward. After use, detach all components and rinse them under warm water to remove any meat or food particles. For a deeper clean, you can use mild soap and a soft brush to scrub the grinding plates and other parts. It’s important to avoid soaking the metal parts for extended periods to prevent rusting. Once cleaned, dry them thoroughly before reassembling to ensure longevity. Regular maintenance will keep your KitchenAid meat grinder attachment in excellent condition for many batches of ground meat.
Q: What types of grinding plates come with the KitchenAid meat grinder attachment?
A: The KitchenAid meat grinder attachment typically includes multiple grinding plates to suit different textures. You will often find fine, medium, and coarse grinding plates, allowing you to customize the consistency of your ground meat or vegetables. The coarse grinding plates are particularly useful for creating gourmet burgers or chunky sausages. Some models may also include a plate specifically designed for grinding hard cheeses, expanding your culinary options. Always refer to the manual for your specific attachment to see what is included and how to use each plate effectively.
Q: Can I use the KitchenAid food grinder attachment to make sausage?
A: Absolutely, the KitchenAid food grinder attachment is an excellent choice for making sausage. It typically comes with sausage stuffer tubes, which make it easy to fill casings with your ground meat mixture. You can use the different grinding plates to achieve your desired texture, whether you prefer finely ground or coarsely ground meat. This attachment provides a convenient, efficient way to create homemade sausages, ensuring you control the ingredients and flavors. Just ensure you have the appropriate casings ready for stuffing, and follow a trusted sausage recipe for the best results.


