
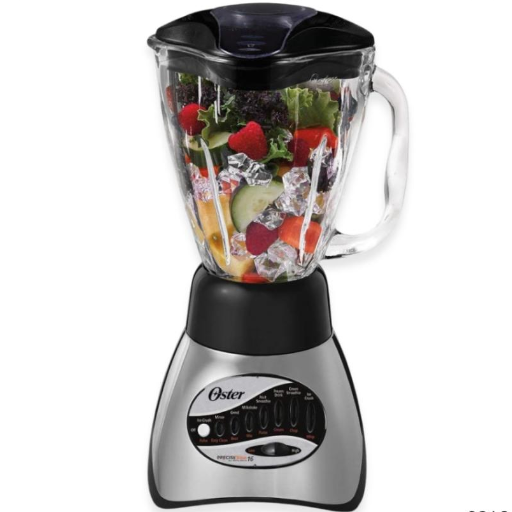
Suppose you are a proud owner of an Oster blender and determined to keep the kitchen appliance operating at top efficiency. In that case, the importance of knowing how to replace the necessary parts and maintain them cannot be overstated. At any rate, if you’re serious about cooking, you believe that the functioning of your Oster blender can be worse for several reasons. This article serves several purposes at the same time. It will discuss determining why and which Oster parts are often replaced, what is done if some repair is needed, and provide all this information in a step-by-step format. It can be a blunt blade or a broken container or it can be an overheated motor that does not start due to an electric fault, as long as you have identified the problems and would want to know how to fix them — read on. Take some practical preparation measures before reading, resuscitating, and ensure that the device is returned to an optimally functional state. Let’s establish adaptable settings for blending and protecting the machine’s outdated functions.
Understanding Oster Blender Components
For instance, the typical Oster blender contains several key components, which serve the main purpose in the process of blending:
- Base/Motor Housing
In almost all blender guns, the motor is located in the base along with the blades. Blended items work efficiently if the motor is sturdy, and the team is always exposed to a lot of heat, which could mean wear and tear.
- Blender Jar
Right, this is the part where the products are poured inside. Most jars are made of glass or tough plastic material, whose integrity should not be compromised by cracks or other forms of damage that can be dangerous or affect the performance of the blend.
- Blades
Blades are used to make chopping and blending actions effective. A consumer will use them for a certain period, which would cause them to be less sharp, dry, or out-of-order dry procedures.
- Lid and Cap
A lid is used to prevent spillover whenever the blender is in operation, while the inner cap is included for the user to add and mix substances while still in operation. A tight fit is important so that smooth operation can be ensured.
- Sealing Ring
The seal ring is positioned between the cutting assembly and the mixing jar, and it affords the elimination of leaks. It is necessary to change the rubber mantle in such situations to ensure the inner diameter, which is in direct contact with machine parts, is balanced.
Types of Blades in Oster Blenders
|
Blade Type |
Description |
Best For |
Key Features |
|---|---|---|---|
|
4-Point Blade |
Standard design for most Oster blenders |
Smoothies, soups, and purees |
Durable stainless steel |
|
6-Point Steel Blade |
Advanced design for faster, finer blending |
Ice crushing, high-speed blending |
Extra sharp, precision cutting |
|
Ice Crusher Blade |
Specifically designed for crushing ice |
Frozen drinks, smoothies with ice |
High power, ice-crushing efficiency |
|
Fusion Blade |
Dual-action blade for superior blending results |
Multi-purpose blending and chopping jobs |
Reversible, optimized for efficiency |
|
Cross Blade |
Specialized for chopping and precise blending |
Salsas, dips, and certain food textures |
Compact size with versatile use |
|
Replacement Blade Assembly |
Compatible blade for Oster blender models |
Maintenance or replacing damaged blades |
Direct-fit design for easy replacement |
The Role of Seals and Gaskets
Seals and gaskets play a crucial role in this regard, enabling the efficient and safe use of modern blenders. Their primary aim is to create an air and water seal to prevent liquid from seeping out of the connecting parts or any part of the appliance, thus impairing it. Best seals and gaskets are often made of silicon or rubber, which is strong against sliding surfaces and harsh environments of liquid flow, liquid pressure, and temperature, which are normally found in such applications.
Most components, like the seals and the assembly, are dimensioned at the lowest reliability enabled by the material, since badly dimensioned seals will lead to leakages, poor structural rigidity, and increased energy usage due to the compression of the seals. Over the years, materials science research has led to more and more reliable and longer-lasting seals installed in the product, reducing the rates of replacements and helping in the promotion of sustainable kitchen appliance utilization. Also, they require timely inspection and maintenance to ensure their continued proper functioning, enhancing the performance and durability of the blender and any such equipment.
Identifying Essential Blender Parts
Recognizing what comprises a blender is an excellent practice for evaluating its operability and keeping it in working condition. One part that one should concentrate on is the motor inserting section, as it houses the motor that is mostly used for powering the blades. The bigger the motor’s watts and its moment force, the more ingredients can be inserted into the blender, including soft fruits where there is ice, and most importantly, ingredients even tougher, such as nuts.
The next important part is the blending container, which is frequently made of long-lasting components like food-safe plastics, glass, typically, and even stainless steel. The space and shape of the jar, in which the ingredients are kept while the blender is operational, and the jars of the different sizes; the way these help in the passing of ingredients or consistencies and food preparation, etc, is what largely influences their selling and purchase.
An additional key feature is the cutting knives that are most often made of toughened stainless steel and are for slicing food or for blending processes. The geometry of blades – like flat, cross, or serrated, etc. – is used to match intended use, for example, there are some units for making puree, some for crushing, and some for grinding. These purposes also necessitate the correct installation of bearings and seals in the cutting tool, ensuring no spillage and smooth operation.
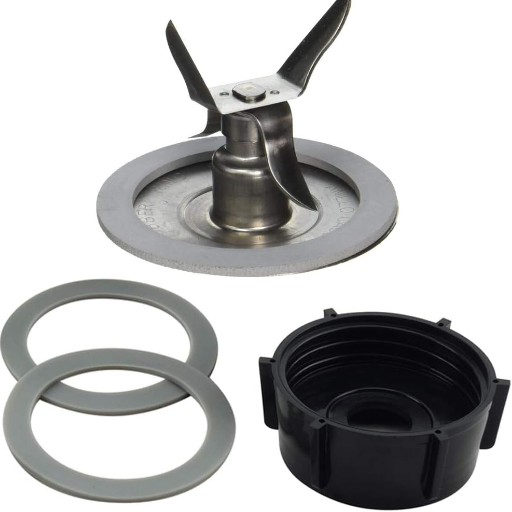
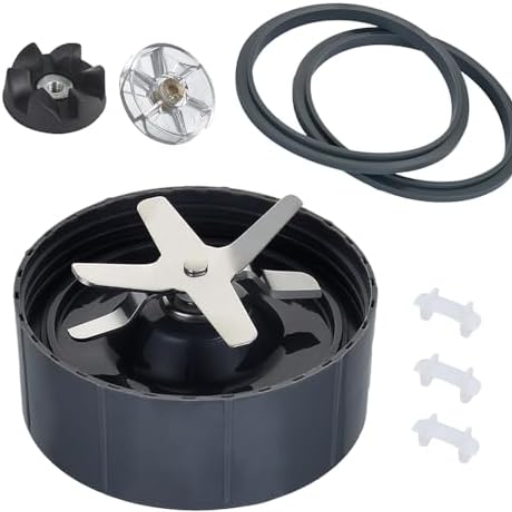
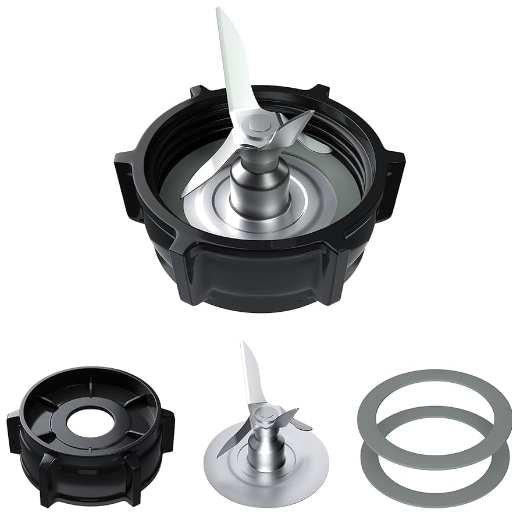
Replacement Parts for Oster Blenders
- Blender Blades – The blender blades are a component that is absolutely necessary, especially because it is what makes the blender function as one. The blades can also wear down as time goes by and working with blunt blades is ineffective. High-standard stainless steel blades are long-lasting, so look out for them and buy them.
- Drive Couplers – The drive coupler is what links the motor to the blade. A faulty coupler might underperform; the experts say it is better to find the correct one to replace it.
- Blender Jars – The replacement jar may be either glass or plastic and come in different capacities to adapt to the different blender models that may be in the market. Always get the right jar for the blender.
- Sealing Rings – Every other time, the rubber seal around the blade will wear out, hence allowing drips to occur. Change the rubbers when necessary to stop the drip juice.
- Lids and Caps – Replacement lids and center caps are two tops that we use to make the food discreet and add ingredients while mixing. It is desirable to ensure that the turus can be rotated without any shaking, thereby minimizing breakage.
In order to avoid damages, in every instance, ensure that the Oster blender model number is checked and that specific parts are bought only from the approved dealers or from the manufacturer.
How to Choose the Right Replacement Blade
To change the blade of an Oster blender, it is vital to understand the essential requirements and match the right one to the machine. Start by checking the serial number of the blender, which is mostly located under the throat of the body or on the base. This protects the blade against mismatch with the blender and the operational environment of the appliance.
One must assess the kind of blade necessary for the blender’s desired usage. More often than not, Oster blenders have two key types of blades, which are the 6 Point Star blades, which are used in basic blending, iced drinks, common reductions, or shakes; and 4-point flat blades for more meticulous applications like grinding coffee or cutting nuts. It is best if you can evaluate the blade’s activity range as set forth by its manufacturer first and compare it to your needs.
The type of blade material is also important. To recap, a revolving blade bought should be high-grade, stainless steel without any risk of rust and able to endure constant carting due to the high-speed rotations. Additionally, it should be a well-assembled blade with fitted seals or gaskets to prevent any fluid spills during its operation.
In conclusion, should aim to buy genuine Oster-branded blades from accredited outlets or alternatively through the company’s e-store. These parts have the required levels of manufacturing standard that fall within the specific performance necessary range and will save you from wasting money. Considering all this, you can purchase a new blade and maximize the capabilities of your Oster blender, as well as extend its lifespan.
Common Gaskets and Seals for Oster Blenders
|
Gasket/Seal Type |
Description |
Key Parameters |
|---|---|---|
|
Rubber O-Ring Gasket |
Basic seal for blender assembly |
Flexible, durable, heat-resistant |
|
Silicone Gasket |
Enhanced seal with better flexibility |
Long-lasting, odor-resistant |
|
Flat Rubber Sealing Gasket |
Standard flat gasket for jar bases |
Fits snugly, easy to replace |
|
Neoprene Gasket |
High-performance sealing material |
Resists water, oil, and wear |
|
Double-Sealing Gasket |
Dual-layer design for extra security |
Leak-proof, prevents contamination |
|
OEM (Original Equipment) Gasket |
Authentic brand-manufactured seal |
Ensures perfect compatibility |
|
Heat-Resistant Food-Grade Seal |
Designed for high-heat applications |
Non-toxic, safe for food contact |
Where to Find Genuine Oster Replacement Parts
Step-by-Step Guide to Replacing Blender Parts
- Unplug the Blender
Switch off the device so that there is no threat to the safety of the users when handling the replacement activity.
- Identify the Faulty Part
Examine the blender so as to determine which part is defective, such as the assembly, blade, gasket, or container.
- Order the Correct Replacement
Buy the part using the number or address together with the number of the device procured. When in doubt, genuine parts are also very much available on authorized websites or retailers.
- Disassemble the Blender
Get the dysfunctional part out following the instructions. For instance, untwist the blade assembly or remove the base as necessary.
- Install the New Part
Safely install the part in accordance to the provided instructions, following closely any instructions on alignment or other constructive filling.
- Reassemble and Test
Assemble the blender back, making sure all the parts are touching each other. Plug in the wand and allow it to run for a short while, just to examine if it is in good working condition.
Replacing the Blender Blade
To keep your blender up and running smoothly even after the blades have been changed, some important factors must be considered. The first thing is to check the material and the specifications of the blade you are going to install. The majority of the blades are densely equipped with steel for strength purposes and efficient blending, but variations in size, angle, or form could mean that blending will be problematic.
Secondly, one must always ensure that the gasket and the sealing ring parts are fitted correctly during reassembly. If the gasket is not correctly placed, it may result in water coming out while the appliance’s engine is always placed at the bottom; hence, these water leakages may destroy the motor or even create a risk to the person using the equipment. In addition, regular service such as cleaning the blade and its housing adequately after every use will also lengthen the life of the recent part. By bearing in mind such procedures, the vessel will regain its optimum purpose and serve one for an extended duration without posing any danger.
How to Install a Rubber Gasket
- Prepare the Components
Make sure that all the parts have no dirt or any adhesive left, including the gasket, before starting the process. Check the gasket mounting and/or groove on where the gasket circle has to cut into to ensure it is clean and not damaged.
- Identify the Correct Orientation
Most of the rubber gaskets tend to only fit in one way in order to prevent twisting and shifting, so ensure to check whether there are any markings or guidelines on the gasket showing the proper fitting. Failure to install the gasket correctly may lead to failure to seal or, worse, the gasket may lead to potential leaks.
- Lubricate if Necessary
Some applications could have the gasket seal positioned more easily and more effectively sealed by adding a little food-grade lubricant to the gasket. It is necessary to check if this is actually required by the nature of the gasket and the specific direction of the manufacturer. Repair the gasket joint in this way.
- Position the Gasket Securely
Check the gasket’s orientation with the channel or sealing zone. Install it in the sockets easily, making sure it does not twist or collect wrinkles. Check whether the gasket is entirely within the groove and does not service any void spaces.
- Inspect the Seal
After fitting, inspect the gasket to see if the alignment is even on the edge. If there is any misalignment, these cracks along the interface could affect the functional behavior of the system and make the seals ineffective.
- Reassemble and Test
Then, properly put back the removable parts in place, taking caution to secure all connections appropriately. Lastly, put the blotches to the test like, say, by a water or some other liquid a safe one at that then check for any leakages. In case the pressure is not even, tighten the bolts or fixtures very slightly.
Steps for Changing the O-Ring
- Inspect the Groove and Surrounding Areas
Begin by cleaning the space properly before applying the O-ring. Make sure that all particles, old adhesives, or sealants are removed by using a soft brush or a lint-free cloth. Inspecting the groove while making sure not to chip, scratch, or create any other imperfection on that surface will be crucial to prevent the O-ring from losing its waterproof protection. Such defects that would require additional work to be carried out are more likely to be identified by coke and pill comprising looking, feeling, and touching the tested joint.
- Lubricate the O-Ring
Use a compatible lubricant such as silicone grease very sparingly on the o-ring. By proper rotation, installation is made less cumbersome and the damage to the o-ring’s elastic limits due to twisting and pinching is reduced considerably. The o-ring should also provide a better tightness due to the reduction of the o-ring’s volume settling in the groove under pressure. It is crucial to confirm that the lubricants used are not hazardous to the contact materials.
- Install the O-Ring
Place the o-ring in the groove, providing it is not twisted or is not misshapen like a ‘pretzel’. Slide it in position and improve the central alignment of the o-ring along the perimeter. If necessary, use specialized equipment like O-ring picks to help with fitting without causing harm. Do not use excessive force as this might damage the O-ring and the fit.
- Final Assembly
Maintaining Your Oster Blender
- Clean After Each Use
Disassemble the parts of the blender, such as the jug, the top, the blade, and its assembly if it is separable, and put them in some water. Rinse thoroughly and let it dry in the air completely before you assemble it.
- Inspect the Blade Assembly
Please ensure that the blades are checked at regular intervals for wear. If deemed blunt or bent, they should be replaced in order to improve the performance of the blender.
- Maintain the Sealing Ring
Check if the sealing (O-ring) is damaged or has it gone brittle, cleaning it carefully and replacing it if there are signs of danger from leaking fluids occurring.
- Avoid Overloading
Avoid overfilling the blender by twice the indicated level. Excess loading can lead to motor strain, resulting in the appliance’s reduced longevity.
- Periodic Deep Cleaning
Tips for Extending the Life of Your Blender
- Monitor Motor Temperature
Let the machine rest after running it continuously for long periods. Excessive heating of the machine can lead to damage to the various internal parts, thus affecting its performance. Two-minute or less blending breaks are encouraged to prevent engine skip. Also, wait between 5-10 minutes after making a very heavy process to the blade, as this will also aid in heating, and heating has stopped.
- Use Approved Accessories
When using any attachments and auxiliary parts, only use the ones that are recommended by or provided by the company. Any other attachments will not be of any use anyway, as they will not fit any alterations in the motor or this may cause adverse effects on efficiency.
- Blend Properly Prepared Ingredients
To prevent the knife and the keratin blade from further damage, you can prepare hard or bulky ingredients such as fruit and vegetables before putting them in the liquid container, for diminished blinding in case of frozen isalidulute, a little.
- Replace Worn Components
Be sure to regularly check parts like the blades, o-rings, and the motor coupling for possible wear. If there is a problem, do as the ordinary razor blade(lol) and change such parts. For example, blades become loaded and cannot do their work proficiently, and in case of more exertion, motors can wear out irreparably.
- Avoid Continuous Pulsing
The food processor has the pulse feature, which is intended for quick pulses across the material to be processed and should not be repeated for a long duration time. In most cases, if the food processor is used throughout only for pulsing to carry out its functions, it can shorten the life of the machine.
- Store the Blender Properly
Signs That Indicate Parts Need Replacement
- Unusual Noises
If the blender smells during operation, producing any grinding, squealing, or rattling noise, it could be mitigated by changing the motor, the bearings, or the blade rotor. Such noise is often a mechanical problem that may be because the innermost parts are misaligned.
- Leaking From the Jar Base
Bear in mind that the blender jar can leak at its base as a result of faulty gaskets, among other circumstances. This is an issue that should not be ignored, as if left unattended, the liquid could get into the motor base, causing technical damage.
- Reduced Blending Efficiency
In case the blender is not working well in the customization of ingredients or it has some fraction of ingredients clinging to the walls without blending them well, there may be a problem with the edges of the blade; they may be blunt or bent. Unsuccessful blending can still point to a decrease in motor power as a result of damage from inside.
- Overheating Regularly
Elevated temperature, even under normal working conditions, is often indicative of a motor being overworked or poor air circulation. This malady could aggravate and eventually ruin the motor in case it is not dealt with.
- Visible Damage or Corrosion
Troubleshooting Common Issues
If the blender fails to power on, check the following steps to identify and resolve the issue:
- Ensure Proper Power Connection
Check that the blender is properly connected in the socket. Check the socket for power with a different device just in case.
- Inspect the Power Cord
Search for visible harm, such as wires with worn-out or stripped insulation. Turn off the device and unplug the power cord, since using a frayed wire is dangerous and may lead to fire.
- Check the Safety Mechanisms
For most of the blenders that are in the market today, there are safety mechanisms integrated in them. This includes that most of them are equipped with covers and jars with locks. Whenever the apparatus does not work as intended, before suspecting that the apparatus is faulty, ascertain that all parts are properly assembled and well-fitted.
- Reset the Blender
Some models have a reset button or may require a cool-down period before operation. Situate the powered mixer in an upright position and do not operate for 15 to 20 minutes, as this may cause damage to the motor, and refer to the user manual for additional directions.
Please do not hesitate to contact the application center or a technician for any support in case all deployed troubleshooting tips have been futile.
How to Diagnose Issues with Blades or Gaskets
A blender’s functionality depends mainly on the blades and the gasket components, and once a problem arises, it has to be diagnosed accordingly. To begin with, visually examine the blades for noteworthy damage, for example, if there are any cracks, blunt edges, or even signs of originality, then this blade is not going to work properly. With the blender disconnected from the electric supply, try to shed light on any resistance felt while moving the blade forwards and backwards because such resistance suggests that the bearings are due for replacement or the case is jammed with what could be preventing easy oscillation or rotation.
For the gaskets, they ensure that cracks or tears of the gasket serve any part of the purpose, and the gasket should thus be examined. A non-operational machine, most commonly when there is a damaged gasket. Also, check that the groove in which the gasket is placed fits the gasket perfectly and is clear of dirt, as it may affect our performance, and we are also prone to running rather than in case of misalignment and dirt. In cases of such persistent leakage even after checking the above, it could call for a replacement of the gasket. All times refer to the manual guidelines of the manufacturer on replacement parts and repair of equipment that a professional can arrange.
When to Seek Professional Help
Reference Sources
-
Blender Parts USA – Oster Replacement Parts
This website offers a wide range of replacement parts for Oster blenders, including blades, gaskets, jar bases, and more. It highlights the availability of various models and combo kits, such as ice crusher blades with gaskets and stainless steel fusion blades. The site emphasizes affordability with discounted prices and free shipping options. -
Goodman’s – Oster Blender Blades and Accessories
Goodman’s provides a comprehensive selection of genuine Oster parts, including blender blades, seals, and bottom caps. The site focuses on maintaining blender performance with high-quality replacement parts. It also offers detailed product descriptions and competitive pricing for items like the Oster 4961 ice crusher blade and Univen rubber gaskets.
Frequently Asked Questions (FAQs)
Q: What are the common replacement parts for an Oster blender?
A: Replacement parts for your Oster blender typically include blades, gaskets, seals, and jars. The blender jar is crucial for blending ingredients, while the stainless steel blades ensure efficient performance. Gaskets, such as the rubber o-ring and seal gasket, help to prevent leaks during operation. It’s essential to choose genuine Oster replacement parts to maintain the quality and performance of your blender. You can find compatible parts that fit various Oster models, including the Oster Pro 1200. Checking the official Oster website can provide you with an extensive list of available parts and accessories.
Q: How do I replace the gasket in my Oster blender?
A: Replacing the gasket in your Oster blender is a straightforward process that involves removing the blender jar and accessing the seal. First, ensure that the blender is unplugged for safety. Then, take off the jar from the base and locate the rubber ring or o-ring gasket at the bottom. Carefully remove the old gasket and replace it with a new one, ensuring it fits snugly. This replacement is crucial for preventing leaks, especially when blending liquids. Always use authentic Oster gaskets for the best fit and durability.
Q: Where can I find spare parts compatible with Oster blenders?
A: You can find spare parts compatible with Oster blenders at various retailers, including appliance stores and online marketplaces. The official Oster website is an excellent resource for locating genuine Oster replacement parts. It’s vital to ensure that the parts you purchase are specifically made for your model, such as the Oster Pro 1200 or Osterizer blender. Many websites offer a guide to Oster blender parts, making it easier to identify the correct components you need. Check for reviews and compatibility information before making a purchase to ensure you get the right parts for your blender.
Q: What should I consider when buying replacement blades for my Oster blender?
A: When buying replacement blades for your Oster blender, it’s essential to ensure that they are compatible with your specific model. Look for stainless steel blades designed for optimal performance and durability. Additionally, consider purchasing a complete set that may include gaskets and seals to enhance blending efficiency. Genuine Oster blades are recommended to maintain the performance level of your blender. Always check customer reviews and product descriptions to confirm that the blades will fit your Oster or Osterizer blender perfectly.
Q: How do I maintain my Oster blender’s performance?
A: Maintaining your Oster blender’s performance involves regular cleaning and timely replacement of essential parts. After each use, clean the blender jar, blades, and base thoroughly to prevent residue buildup. Pay attention to the gaskets and seals; replace them if you notice any signs of wear or leakage. Additionally, using the correct blending settings and not overloading the jar can help prolong the life of your appliance. Regularly check the blades for sharpness and replace them as needed to ensure that your blender continues to perform optimally.


